Have E-ink; Will Travel - Serial comms with raspberry pi and e-ink
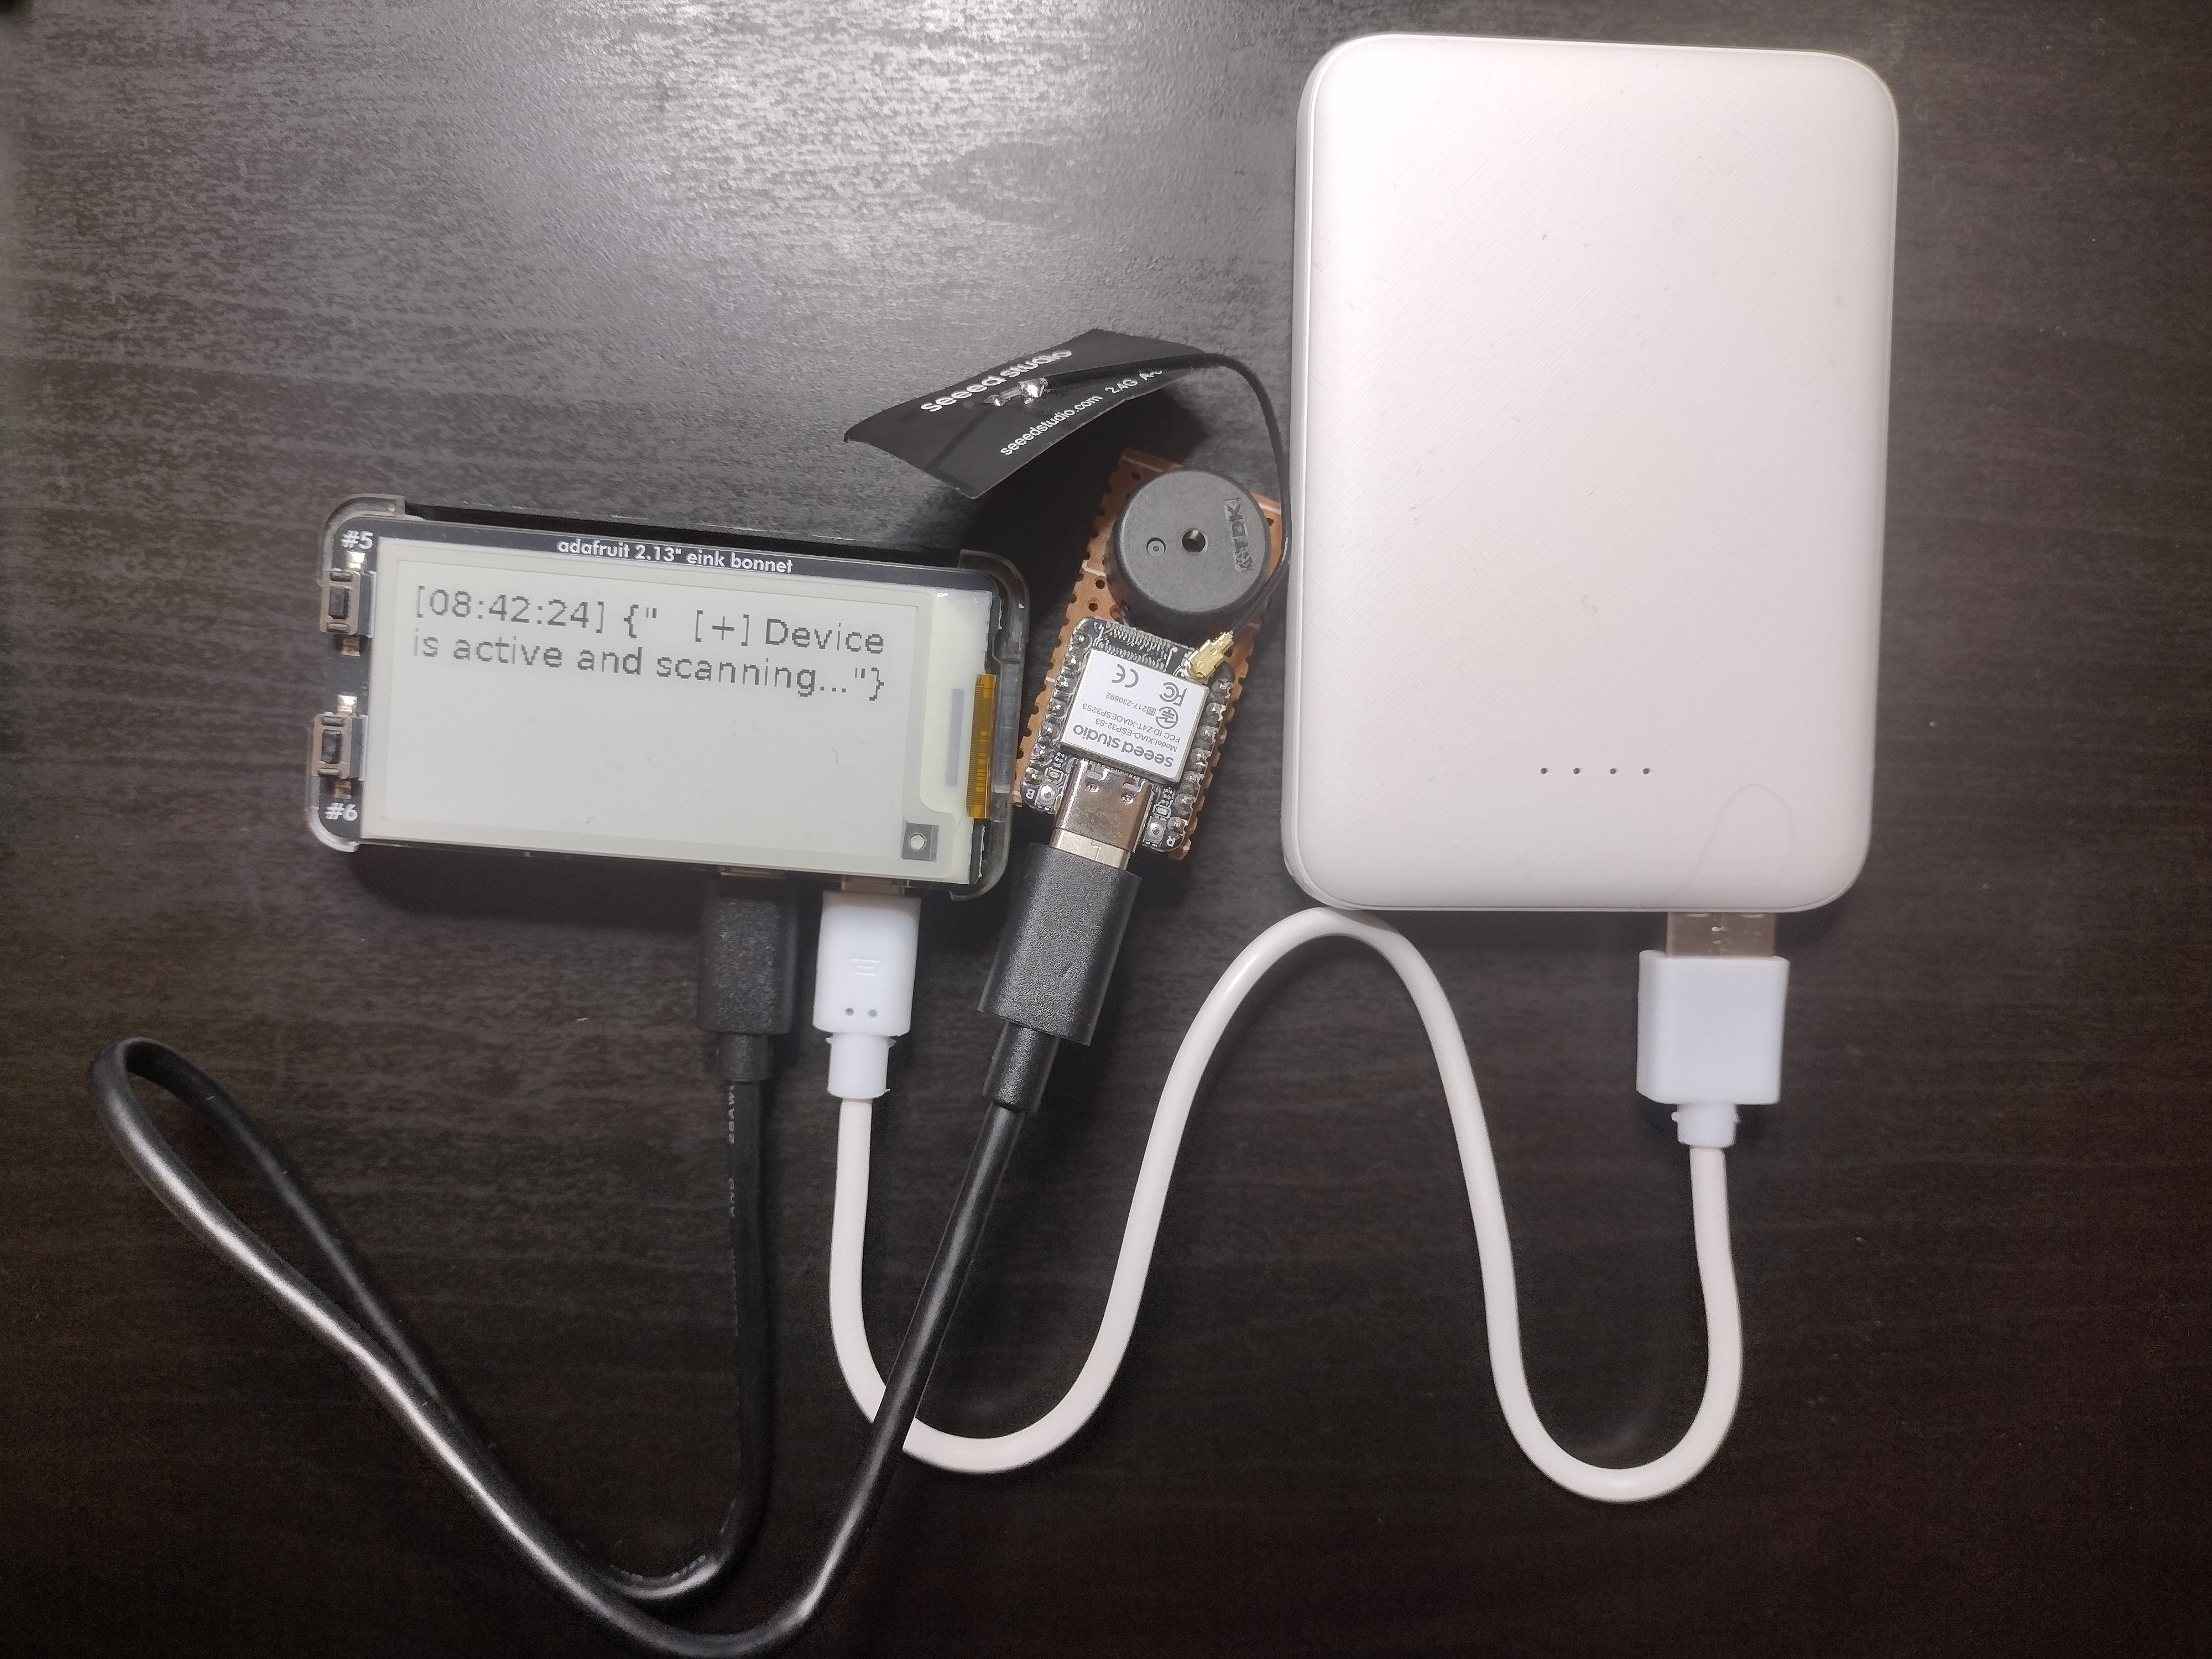
Playing around with different development projects, there’s often a need to listen on a USB serial port connection to see log outputs. If I’m making a device that I want to test out in the wild, without a full display yet, it’d be nice to have a grab-and-go tool for that. So, I decided to put together a raspberry pi zero I had lying around, plus the adafruit e-ink bonnet and a powerbank, to let me read serial logs on the road.
Note before I get into it If you want to be boring (aka practical), you should check out phone apps that allow you to read serial info from devices connected to your phone, that may be a simpler solution than buying more hardware. My way is more fun though.
Hardware Needed
Below is the hardware I used for development and my final product. Net price for this, if you don’t have things lying around already, will probably run 65-75 bucks. The power bank was the spendiest buy, at 27 dollars, so if you already have one that would work, that helps drop the price down.
- adafruit e-ink bonnet
- powerbank capable of 5V output
- raspberry pi zero
- NOTE for the zero, it doesn’t have wifi, so you need to make sure you have the right tools for development. I used:
- USB OTG Host Cable - MicroB OTG male to A female
- a powered USB hub
- A wifi dongle of some sort
- for ease of development, if you’re buying new, it would make sense to instead by a raspberry pi zero W, so you can more easily connect to the pi via wifi/ssh
- NOTE for the zero, it doesn’t have wifi, so you need to make sure you have the right tools for development. I used:
- power cord for the pi zero, for during development
- if you want to keep the pi protected, I found the adafruit pi zero case fits well with the e-ink screen on top
- micro USB cable that can connect to whatever projects you’re working on (in my case, I needed a micro USB to USB C)
- SD card for the pi’s OS
- Micro-hdmi adaptor so you can connect to a monitor, and a keyboard and mouse for the pi
- Technically if you do everything right during initial setup, you don’t need this. In the real world it’s good to have everything for troubleshooting during your initial Pi setup.
Why e-ink?
Cuz it’s fun, honestly. A common argument for e-inks is power saving, since you don’t have to give it power to keep what was last on the screen, but I haven’t profiled that so I can’t say for sure. I really like the visual look of e-inks, and want to work on future projects with e-inks, so I figured this would be an easy project to do some basic testing with an e-ink screen.
A common “con” of e-inks is the refresh rate, a lot of them have miserable refresh rates if you want real-time or near-real-time responses. For the sort of projects I work on, I’m not getting spammed by serial logs, so the slower timing isn’t a problem. And from my testing, this e-ink screen has pretty slow refresh. I suspect the slow refresh could be improved if I dug into the docs more and looked for some time-saving hacks either in the python library from adafruit or how I’m displaying things, but for now, I’m just keeping things simple.
Setup And Verification
Hardware setup
Put the pi in the case if you’re using one, then connect the e-ink bonnet to the raspberry pi. Make sure it’s fully seated, I had some weird issues with the display not working that turned out to be because I hadn’t pushed them together hard enough.
Plug in the OTG cable, hook it up to your powered USB hub, and plug in your wifi dongle, and if you want to do setup using the pi’s GUI, connect a keyboard and mouse here.
Software
Flash the latest version of the raspberry pi OS for your zero, using the Raspberry Pi Imager program. You’ll also want to setup your username and password and enable SSH. If you have a pi zero with no wifi, you’ll want to setup a keyboard and monitor so you can configure the wifi via the wifi dongle. Once the initial setup is done, you should be able to just remote in via ssh and do future steps over that. If you haven’t had experience setting up a pi before, the official docs are pretty good.
Install the blinka library from adafruit. They have good instructions here, that involve setting up a virtual environment and adding their blinka python script to the $PATH environment variable.
Once you have your virtual environment setup, you’ll also want to install the EPD library and the pillow library with this:
pip3 install adafruit-circuitpython-epd
sudo apt-get install python3-pil
To validate everything works, you can run the REPL (python3) on your pi and run the following script, it should print a “Hello world” message on the e-ink screen, and you can then write more to the screen by just calling the display_text function, e.g. display_text("my new string!")
import board
import busio
import digitalio
from PIL import Image, ImageDraw, ImageFont
from adafruit_epd.epd import Adafruit_EPD
import serial
import time
import serial.tools.list_ports


from adafruit_epd.ssd1680 import Adafruit_SSD1680Z


# First define some color constants
WHITE = (0xFF, 0xFF, 0xFF)
BLACK = (0x00, 0x00, 0x00)

# Next define some constants to allow easy resizing of shapes and colors
BORDER = 5
FONTSIZE = 18
FONT_MAX_LENGTH = 27
BACKGROUND_COLOR = WHITE
TEXT_COLOR = BLACK


# create the spi device and pins we will need
spi = busio.SPI(board.SCK, MOSI=board.MOSI, MISO=board.MISO)
ecs = digitalio.DigitalInOut(board.CE0)
dc = digitalio.DigitalInOut(board.D22)
rst = digitalio.DigitalInOut(board.D27)
busy = digitalio.DigitalInOut(board.D17)
srcs = None


# e ink display
display = Adafruit_SSD1680Z(122, 250, spi, cs_pin=ecs, dc_pin=dc, sramcs_pin=srcs,
                          rst_pin=rst, busy_pin=busy)


display.rotation = 1

# re-draw the entire screen with the new text message
def display_text( text: str):
    image = Image.new("RGB", (display.width, display.height), WHITE)

    # Get drawing object to draw on image.
    draw = ImageDraw.Draw(image)

    # Draw a filled box as the background
    draw.rectangle(
        (0, 0, display.width - 1, display.height - 1),
        fill=BACKGROUND_COLOR,
    )

    # Load a TTF Font
    # NOTE: linux systems normally default have this font
    font = ImageFont.truetype("/usr/share/fonts/truetype/dejavu/DejaVuSans.ttf", FONTSIZE)

    # Draw the text
    draw.text(
    (BORDER, BORDER),
    text,
    font=font,
    fill=TEXT_COLOR,
    )

    # Display image.
    display.image(image)
    display.display()

display_text("Hello World!")
Python Script
This script is the meat of the project. The basic functionality it sets up is:
- Configure and connect to the Adafruit E-ink screen using circuit python and adafruit’s libraries
- Constantly listen on a given serial port for any text
- Currently the script hard codes which USB device to listen to, and what baudrate/serial configuration it has
- Given the text, re-format it a bit to make sure it doesn’t run off the screen of the e-ink, and add a timestamp
- It also checks if it’s receiving the exact same text repeatedly (e.g. a heartbeat message from the device). In this case, it will only update the e-ink screen if it’s been longer than a minute, so the timestamp gets updated and you know the script is still working.
- Using the Pillow library, draw a new image for the e-ink screen with the re-formatted text, then send it to the e-ink to display
You can directly run the script on the pi by copying it over and then using ssh to run.
Don’t Forget You’ll need to activate your python virtual environment before you try running it though!
As it’s just shy of 175 lines, I’ll just include the full script below in the Full Code section, for you to take a closer look.
I do want to point out some interesting pieces of the script.
Finding the serial device
Finding the device I want to listen to ends up being more complicated than you may think. If, for example, I’m using a Xiao ESP32 device, I can plug in a USB C to micro USB cable to it and the raspberry pi, and it will be automounted at a standard /dev/tty<blah> (e.g. /dev/ttyACM0). However, the exact number of this ESP32 can change from one boot up to another. So, if I just hardcode the serial connection, e.g. serial.Serial('/dev/ttyACM0', 115200, timeout=1), the script will occasonally fail.
My workaround for this is to use the Product ID and Vendor ID (PID and VID) and the serial.tools.list_ports functionality in python. The PID and VID are part of USB standard ways of identifying devices, the Vendor ID is assigned to a particular company by the USB Committee, and the Product ID is assigned by the company to a particular USB device.
With this, I can look through connected USB devices and filter down to only devices that are specifically an Espressif USB JTAG/serial connection, and connect to the first one I find. Since I only ever have one ESP32 connected, it works great.
After I wrote this all up, I did some extra searching online, and did see some people solved this by creating udev rules to create permanent /dev/ mount points for their USB devices. The trade off here is that you have to do more customizing of the raspberry pi OS. I was trying to keep this to a minimum to make it easy to create more of these setups in the future, so I’m satisified with the python solution for now.
Troubleshooting Finding Your Device
If you want to use this script, and you’re having issues with getting the right PID and VID, or you’re unsure if python is actually seeing your device, this lil python script, run in the REPL can help you out:
import serial
import serial.tools.list_ports
for p in serial.tools.list_ports.comports():
    print(p.pid)
    print(p.vid)
    print(p.manufacturer)
Running the lsusb command can also help, to make sure the pi is seeing your device, and it also gives your pid/vid in hex
> lsusb
Bus 001 Device 006: ID 303a:1001 Espressif USB JTAG/serial debug unit
Checking in multiple different ways can narrow down which part of your system is currently acting up. E.g. if python isn’t showing your device but the lsusb is, maybe there’s an issue with your python installation. But if the python script and lsusb cant see it, maybe it’s an issue with your device, or the physical port.
Fun Fact testing in multiple ways to narrow down which “thing” is breaking, is a super valuable skill for firmware development, software development, and general life. (insert “the more you know” banner here)
Reformatting text
To keep any text I get from the serial device from running off the right side of the e-ink screen, I added a function that replaces spaces with the newline character \n whenever the text starts getting too long. This feels like a nice way to display the text without getting weird cutoffs, though it depends on the type of text you’re getting from your serial device.
I also currently dont have it check to see if the text is too long and will go off the bottom of the screen. My current use doesn’t need that functionality, so why add it? If I do, I’ll most likely update the script to do more of a buffer queue system, to support faster serial logs as well as longer messages.
def reformat_text(text: str, maxlength: int):
    new_string = ""
    cur_row_length = 0
    for word in text.split(' '):
        if cur_row_length + len(word) < maxlength:
            if len(new_string) == 0:
                new_string = word
                cur_row_length = len(word)
            else:
                new_string = new_string + " " + word
                cur_row_length += len(word) + 1
        else:
            new_string = new_string + "\n" + word
            cur_row_length = len(word)
    return new_string
Systemd
Once I have the python script working, I want to run it automatically on every boot. This means I will have to dip my toes into the systemd world.
Systemd manages services on linux, where services are just long-running programs that can be configured to run at certain times, or in my case, on boot, and then forever. To tell Systemd I have a new program I want it to handle, I have to make a service configuration file in the right location that it’ll look at, and tell it I want it to boot, and if my program crashes out, have it restart it.
The following Systemd service configuration file, does just that, when saved at /lib/systemd/system/shellscript.service.
[Unit]
Description=My Python Autostart Script
After=multi-user.target

[Service]
User=daniellet
WorkingDirectory=/home/daniellet
ExecStart=/home/daniellet/start_script.sh
Restart=always
RestartSec=5

[Install]
WantedBy=multi-user.target
I created my python file and saved it in my user’s home directory, which is why I tell systemd to run as me, in my /home/daniellet directory. The ExecStart tells it what script to run. But you may notice, that script isn’t my python script! Instead, it’s a trusty bash script, what’s up with that!
We can’t run the python script directly simply because the python script is running in a virtual environment, and you will need to activate the virtual environment every time the Pi is rebooted. So this bash script, saved as start_script.sh, does just that. Create it in your home directory, and be sure to run a chmod +x to make it executable after you make it.
#!/bin/bash
source env/bin/activate
python3 -u printing_to_eink.py
The -u flag on the python command is actually important. My python script prints logging info to standard out. Systemd has built in support for logging standard out info from the services it runs, but python buffers the standard out, and when testing, was resulting in the logging output not actually getting logged. The solution was to add the -u flag, which makes it unbuffered and output right away.
Once the bash script and config file are made, you’ll need to reload the systemd system so it re-looks for configuration files and sees my new service. You can do this with sudo systemctl daemon-reload . Now you can start using the systemd commands to mess with your new service! The service name will be the name of the configuration file you made (in my case, shellscript.service)
Here are some useful commands around systemd for troubleshooting your setup
Manually start/stop the service:
sudo systemctl start shellscript.service
sudo systemctl stop shellscript.service
Check Current Status of the service:
sudo systemctl status shellscript.service
Toggle if the service runs at boot:
sudo systemctl enable shellscript.service
sudo systemctl disable shellscript.service
Now, you can also see the logging output from my python script by using journalctl. When it’s running, you can use the following command to see the logs:
journalctl -u shellscript.service
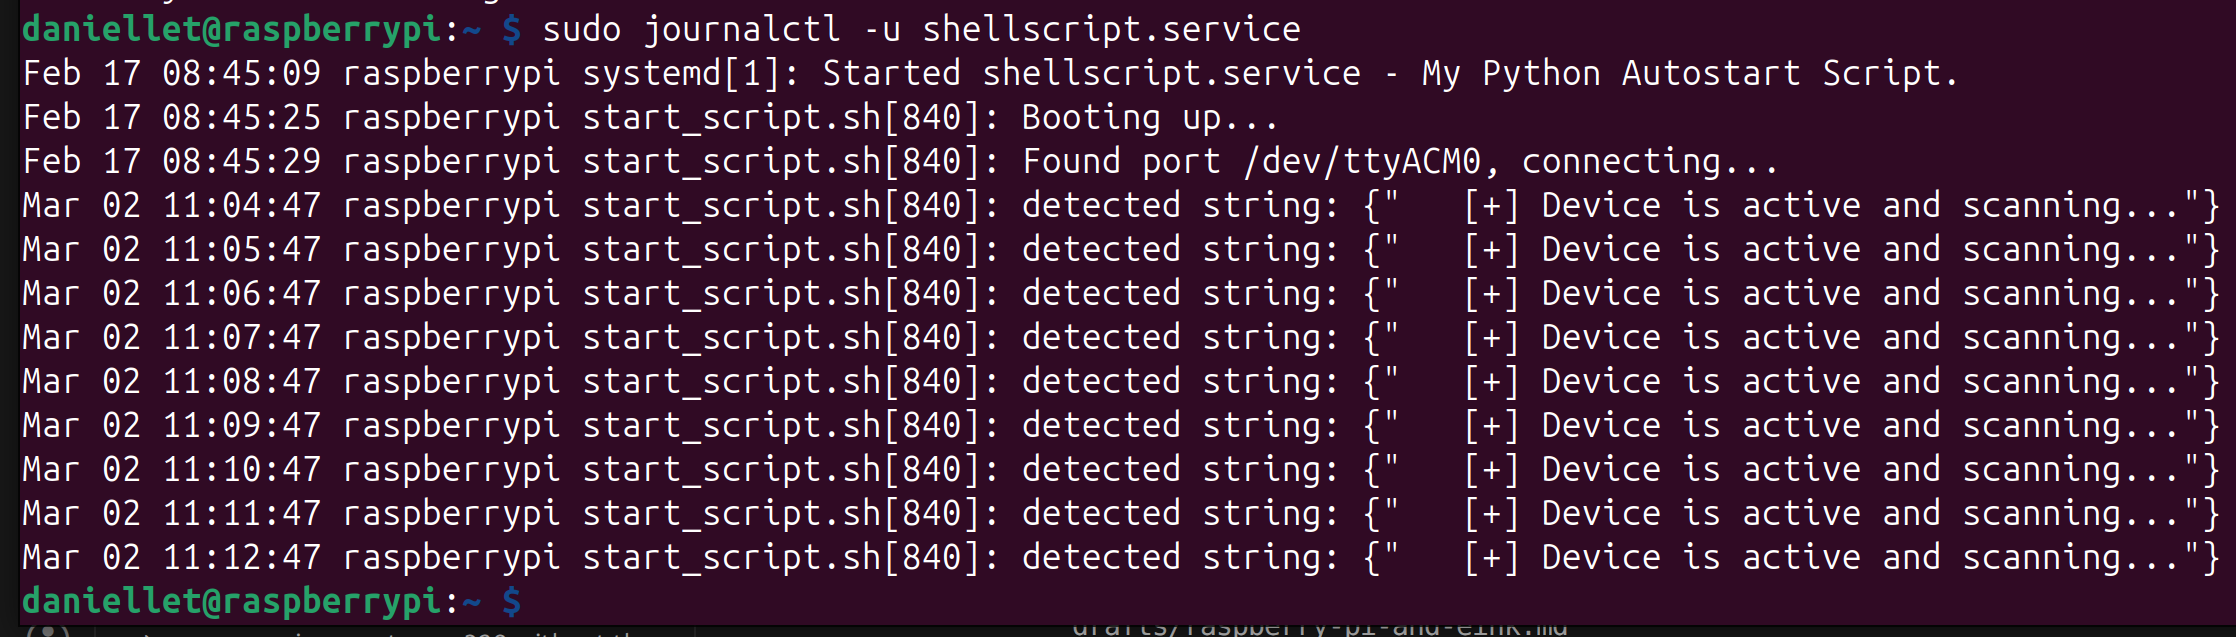
With the service now enabled, you should be able to unplug and re-plug in the power to the pi zero, and the e-ink screen should display a “Booting up…” message, followed by the serial output from your device! You did it!
NOTE The initial bootup time on my pi is pretty dang slow, so be patient!
Future improvements
Some ideas for future improvements that may or may not come to pass:
- Update the script to not hard-code the PID/VID and baudrate
- or update to have hardcoded udev rules so the script doesn’t have to hunt for the serial connection
- make a nifty enclosure for it, either 3D printed or some other way
- Currently the timestamp is what it thinks is central time, but since it doesn’t have an internal battery, when I pull the power, the clock doesn’t stay up to date. And with no internal wifi, it doesn’t update time from the internet. So I’d like to either add an RTC battery, or update the timestamp to simply be time from boot
Conclusion
Setting up the e-ink screen and getting it running for a basic use like this was easier than I had expected. I think I probably spent more time making sure my systemd script was setup correctly than writing the python script. And I did end up using this setup a couple times while testing other devices, so it wasn’t just a fun project with no application. I’ll definitely be keeping this e-ink screen in mind for future projects.
References
Adafruit’s e-ink guide: https://learn.adafruit.com/2-13-in-e-ink-bonnet
Setting up circuitpython blinka library: https://learn.adafruit.com/circuitpython-on-raspberrypi-linux/installing-circuitpython-on-raspberry-pi
Setting udev rules on raspberry pi: https://loketdiversen.nl/2015/02/howto-persistent-device-names-on-raspberry-pi/
Setting up systemd on linux: https://tecadmin.net/run-shell-script-as-systemd-service/
Full Code
Below is the full code for each part of this project. The Systemd configuration and bash file, and the python script.
Systemd
systemd service configuration file, saved at /lib/systemd/system/shellscript.service
[Unit]
Description=My Python Autostart Script
After=multi-user.target

[Service]
User=daniellet
WorkingDirectory=/home/daniellet
ExecStart=/home/daniellet/start_script.sh
Restart=always
RestartSec=5

[Install]
WantedBy=multi-user.target
Bash script
Bash script to activate the python environment and run the python script. Saved as start_script.sh in my home directory.
#!/bin/bash
source env/bin/activate
python3 -u printing_to_eink.py
Python Script
Here is the printing_to_eink.py file that is the meat of the functionality, saved in my home directory. Note the base code was originally pulled from Adafruit’s usage guide and then modified for my particular setup.
"""
ePaper Display text coming from a serial port using the Pillow Library.

Based on the python scripts from https://learn.adafruit.com/2-13-in-e-ink-bonnet/usage
modified for this particular use case

ASSUMES:
- connected to SSD1680Z e-ink bonnet
- screen is black and white
- there is a serial port connected on a USB
- Installed CircuitPython Blinka library from adafruit https://learn.adafruit.com/circuitpython-on-raspberrypi-linux/installing-circuitpython-on-raspberry-pi
- script is running on raspberry pi zero. Has not been tested on other raspberry pi systems (though should work...)

"""

import board
import busio
import digitalio
from PIL import Image, ImageDraw, ImageFont
from adafruit_epd.epd import Adafruit_EPD
import serial
import time
import serial.tools.list_ports


from adafruit_epd.ssd1680 import Adafruit_SSD1680Z


# First define some color constants
WHITE = (0xFF, 0xFF, 0xFF)
BLACK = (0x00, 0x00, 0x00)

# Next define some constants to allow easy resizing of shapes and colors
BORDER = 5
FONTSIZE = 18
FONT_MAX_LENGTH = 27
BACKGROUND_COLOR = WHITE
TEXT_COLOR = BLACK


# create the spi device and pins we will need
spi = busio.SPI(board.SCK, MOSI=board.MOSI, MISO=board.MISO)
ecs = digitalio.DigitalInOut(board.CE0)
dc = digitalio.DigitalInOut(board.D22)
rst = digitalio.DigitalInOut(board.D27)
busy = digitalio.DigitalInOut(board.D17)
srcs = None


# e ink display
display = Adafruit_SSD1680Z(122, 250, spi, cs_pin=ecs, dc_pin=dc, sramcs_pin=srcs,
                          rst_pin=rst, busy_pin=busy)


display.rotation = 1

# replace some space with a newline character so the string will fit on
# the given screen. NOTE: does not have a max number of rows check
def reformat_text(text: str, maxlength: int):
    new_string = ""
    cur_row_length = 0
    for word in text.split(' '):
        if cur_row_length + len(word) < maxlength:
            if len(new_string) == 0:
                new_string = word
                cur_row_length = len(word)
            else:
                new_string = new_string + " " + word
                cur_row_length += len(word) + 1
        else:
            new_string = new_string + "\n" + word
            cur_row_length = len(word)
    return new_string

# re-draw the entire screen with the new text message
def display_text( text: str):
    image = Image.new("RGB", (display.width, display.height), WHITE)

    # Get drawing object to draw on image.
    draw = ImageDraw.Draw(image)

    # Draw a filled box as the background
    draw.rectangle(
        (0, 0, display.width - 1, display.height - 1),
        fill=BACKGROUND_COLOR,
    )

    # Load a TTF Font
    # NOTE: linux systems normally default have this font
    font = ImageFont.truetype("/usr/share/fonts/truetype/dejavu/DejaVuSans.ttf", FONTSIZE)

    # Draw the text after its been reformated
    new_text = reformat_text(text, FONT_MAX_LENGTH)
    draw.text(
    (BORDER, BORDER),
    new_text,
    font=font,
    fill=TEXT_COLOR,
    )

    # Display image.
    display.image(image)
    display.display()

def process_serial_stream(ser, line_processor):
    """Process continuous serial data stream"""
    line_buffer = b''

    while True:
        try:
            # Read available data
            if ser.in_waiting:
                chunk = ser.read(ser.in_waiting)
                line_buffer += chunk

                # Process complete lines
                while b'\n' in line_buffer:
                    line, line_buffer = line_buffer.split(b'\n', 1)
                    try:
                        text = line.decode('utf-8').strip()
                        if text:
                            result = line_processor(text)
                            if result:
                                yield result
                    except Exception as e:
                        print(f"Process error: {e}")
            else:
                time.sleep(0.001)

        except KeyboardInterrupt:
            break
        except Exception as e:
            print(f"Stream error: {e}")

def parse_msg(line):
    """check if it was a detection, and return if so"""
    # for testing just return it all
    # TODO can add filtering here if the line is something we dont want to print
    # e.g. only print lines that say "DEBUG" or "ERR" in them
    return line

print("Booting up...")
display_text(f"{time.strftime("[%H:%M:%S]")} Booting up...")
last_display_update = time.time()
# trigger serial tracking
last_serial_string = ""
try:

    #find espressif connected board
    #TODO if connected dev board is diff, need to update the PID/VID here
    portname = ""
    for p in serial.tools.list_ports.comports():
        if p.pid == 4097 and p.vid == 12346:
            portname = p.device

    if portname == "":
        print("CANT FIND PORT")
    else:
        print(f"Found port {portname}, connecting...")
        # assumes connection is 115200 baud rate
        # TODO update baudrate if needed
        with serial.Serial(portname, 115200, timeout=1) as ser:
            for detection in process_serial_stream(ser, parse_msg):
                print(f"detected string: {detection}")
                # print all new messages, and if it's been the same message for over 60 seconds
                # (e.g. the same status message of "scanning" or something)
                # print the same message but with updated timestamp, to show its not dead
                if (last_serial_string != detection or (time.time() - last_display_update) > 60):
                    display_text(f"{time.strftime("[%H:%M:%S]")} {detection}")
                    last_serial_string = detection
                    last_display_update = time.time()

except Exception as e:
    print(f"Serial connection failed {e}")