Bluetooth Low Energy and Reversing a Smart Lightbulb
“Smart” things are the wave of the future! Everyone wants some bit of tech that already exists, like a lightbulb, but now controlled through an app! Or at least, that’s what marketers have decided on. But sometimes the companies maintaining the app goes under, or decides to not support what you bought anymore, and your fancy smart lightbulb becomes, well, a $35 lightbulb.
I recently got my hands on an old bluetooth lightbulb that was first made in 2015. But the phone app to control it is clunky and ugly, and hasn’t been updated since 2018. So if I want to still use it now, the options are to have an unmaintaned, potential security-risk app on my phone, or not use it. Or, be me, since I’ve been itching to learn more about bluetooth low energy. In which case, it becomes time to do some reverse engineering!
The Plan
Use the adafruit bluetooth LE sniffer to watch communication between the app and the lightbulb, and see if I can figure out how to turn it on/off, change the color, and set timers.
Intro to Bluetooth Low Energy
First, the bluetooth light will advertise itself using Generic Access Profile, aka GAP, until an app or what have you connects to it. I’m not going to go into that right now, because for reverse engineering, I know it connects, I want to know what it does once it’s connected. That means I need to focus on a different protocol, Generic Attribute Profile, aka GATT.
Once a bluetooth low energy thing is connected to the app that controls it, it switches to using GATT to communicate. GATT is what allows you to interact with the lightbulb (or other peripheral device). You can read data from the lightbulb (e.g. what color it is right now), or send data (e.g. setting the color, setting the timer).
For GATT there are three concepts that are the most important: profiles, services, and characteristics. Profiles are collections of services, and services have a collection of characteristics. Characteristics are basically just key/value pairs that let you read and write data to the connected device. Services collect related characteristics (e.g. color control characteristics would all be grouped in a color service). Profiles are an abstract collection of services, not on a device itself. Services and characteristics ARE on the device.
Let’s do a made-up example of those three concepts. Say I want to make a Lightbulb Profile. Profiles are conceptual collections of services. For this lighbulb profile, I want to have two different services. One service is the Light service, which will control the light color and on/off state. The other service is the timer service. That’ll control what timers a user sets (e.g. have the light turn on at 9am). The Light service will probably need to read and write the current hex color of the lightbulb, so it’ll need a characteristic with a value of the current hex color, and permissions to both read and write. It’ll also need a second characteristic, maybe just called the power characteristic, and the value is 1 or 0, depending on if it’s on or off. I’d also set that to be both read and write, so I could see if the light is turned on, and if not, set it to on.
The Timer service will also have a collection of characteristics that will let it view current timers on the device, add/delete timers, etc.
Here’s a diagram of the above example, to give you another view. Note if you connected to the lightbulb, you wouldn’t see the profile info, just the services and characteristics.
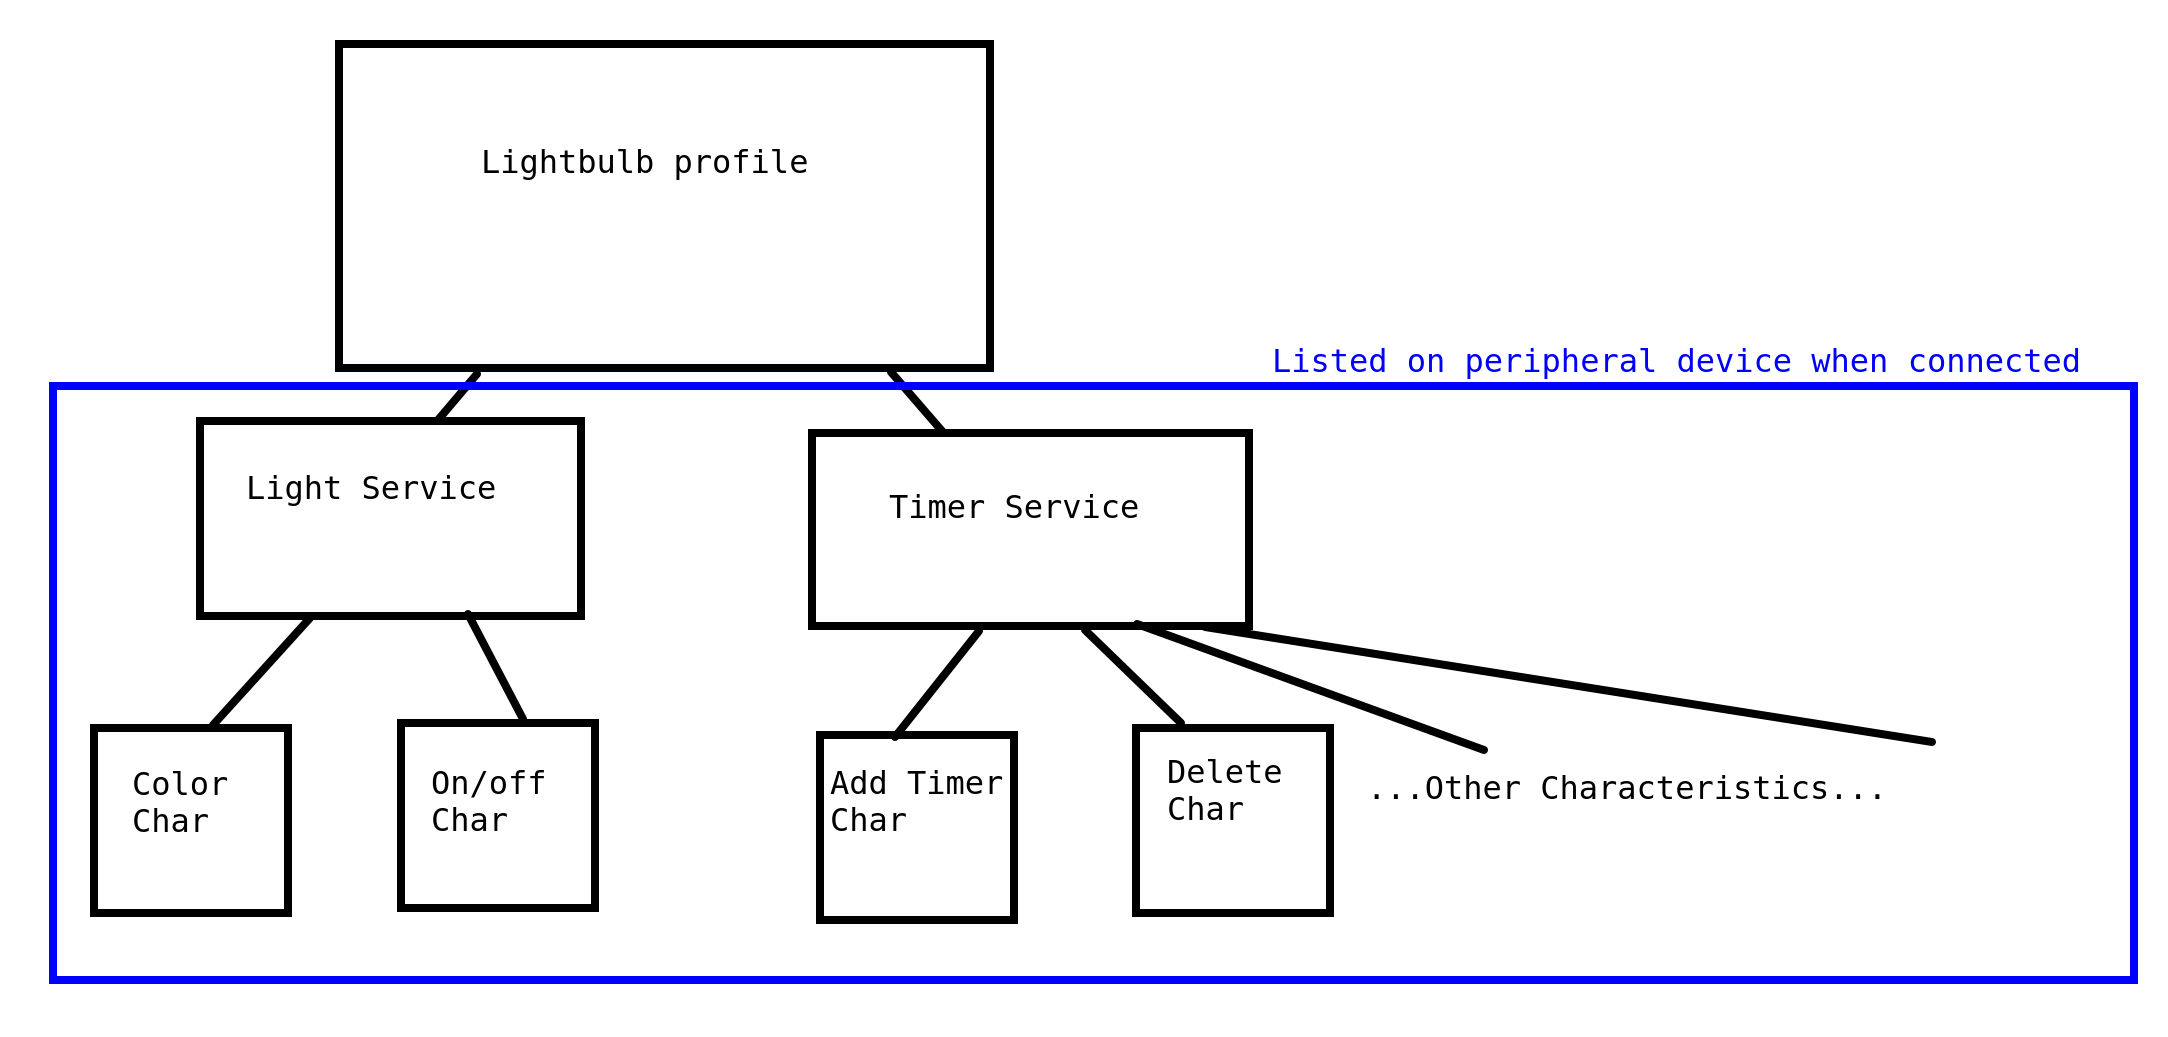
NOTE this is not how the actual lightbulb I’m using is setup, this is just an example of a way to structure a bluetooth LE device to get the concepts in your head
There’s one final bit that is used a lot: the characteristic descriptor. This is attached to a characteristic, and is basically metadata about the characteristic. So for the earlier Lightbulb profile, I can create a characteristic descriptor that is attached to the Color characteristic, and set the descriptor to have a value of “the color of the light in hex”. This helps me if I’m troubleshooting an app to talk with the lightbulb, or when I’m reverse engineering.
The conceptual model I currently have is something like this:
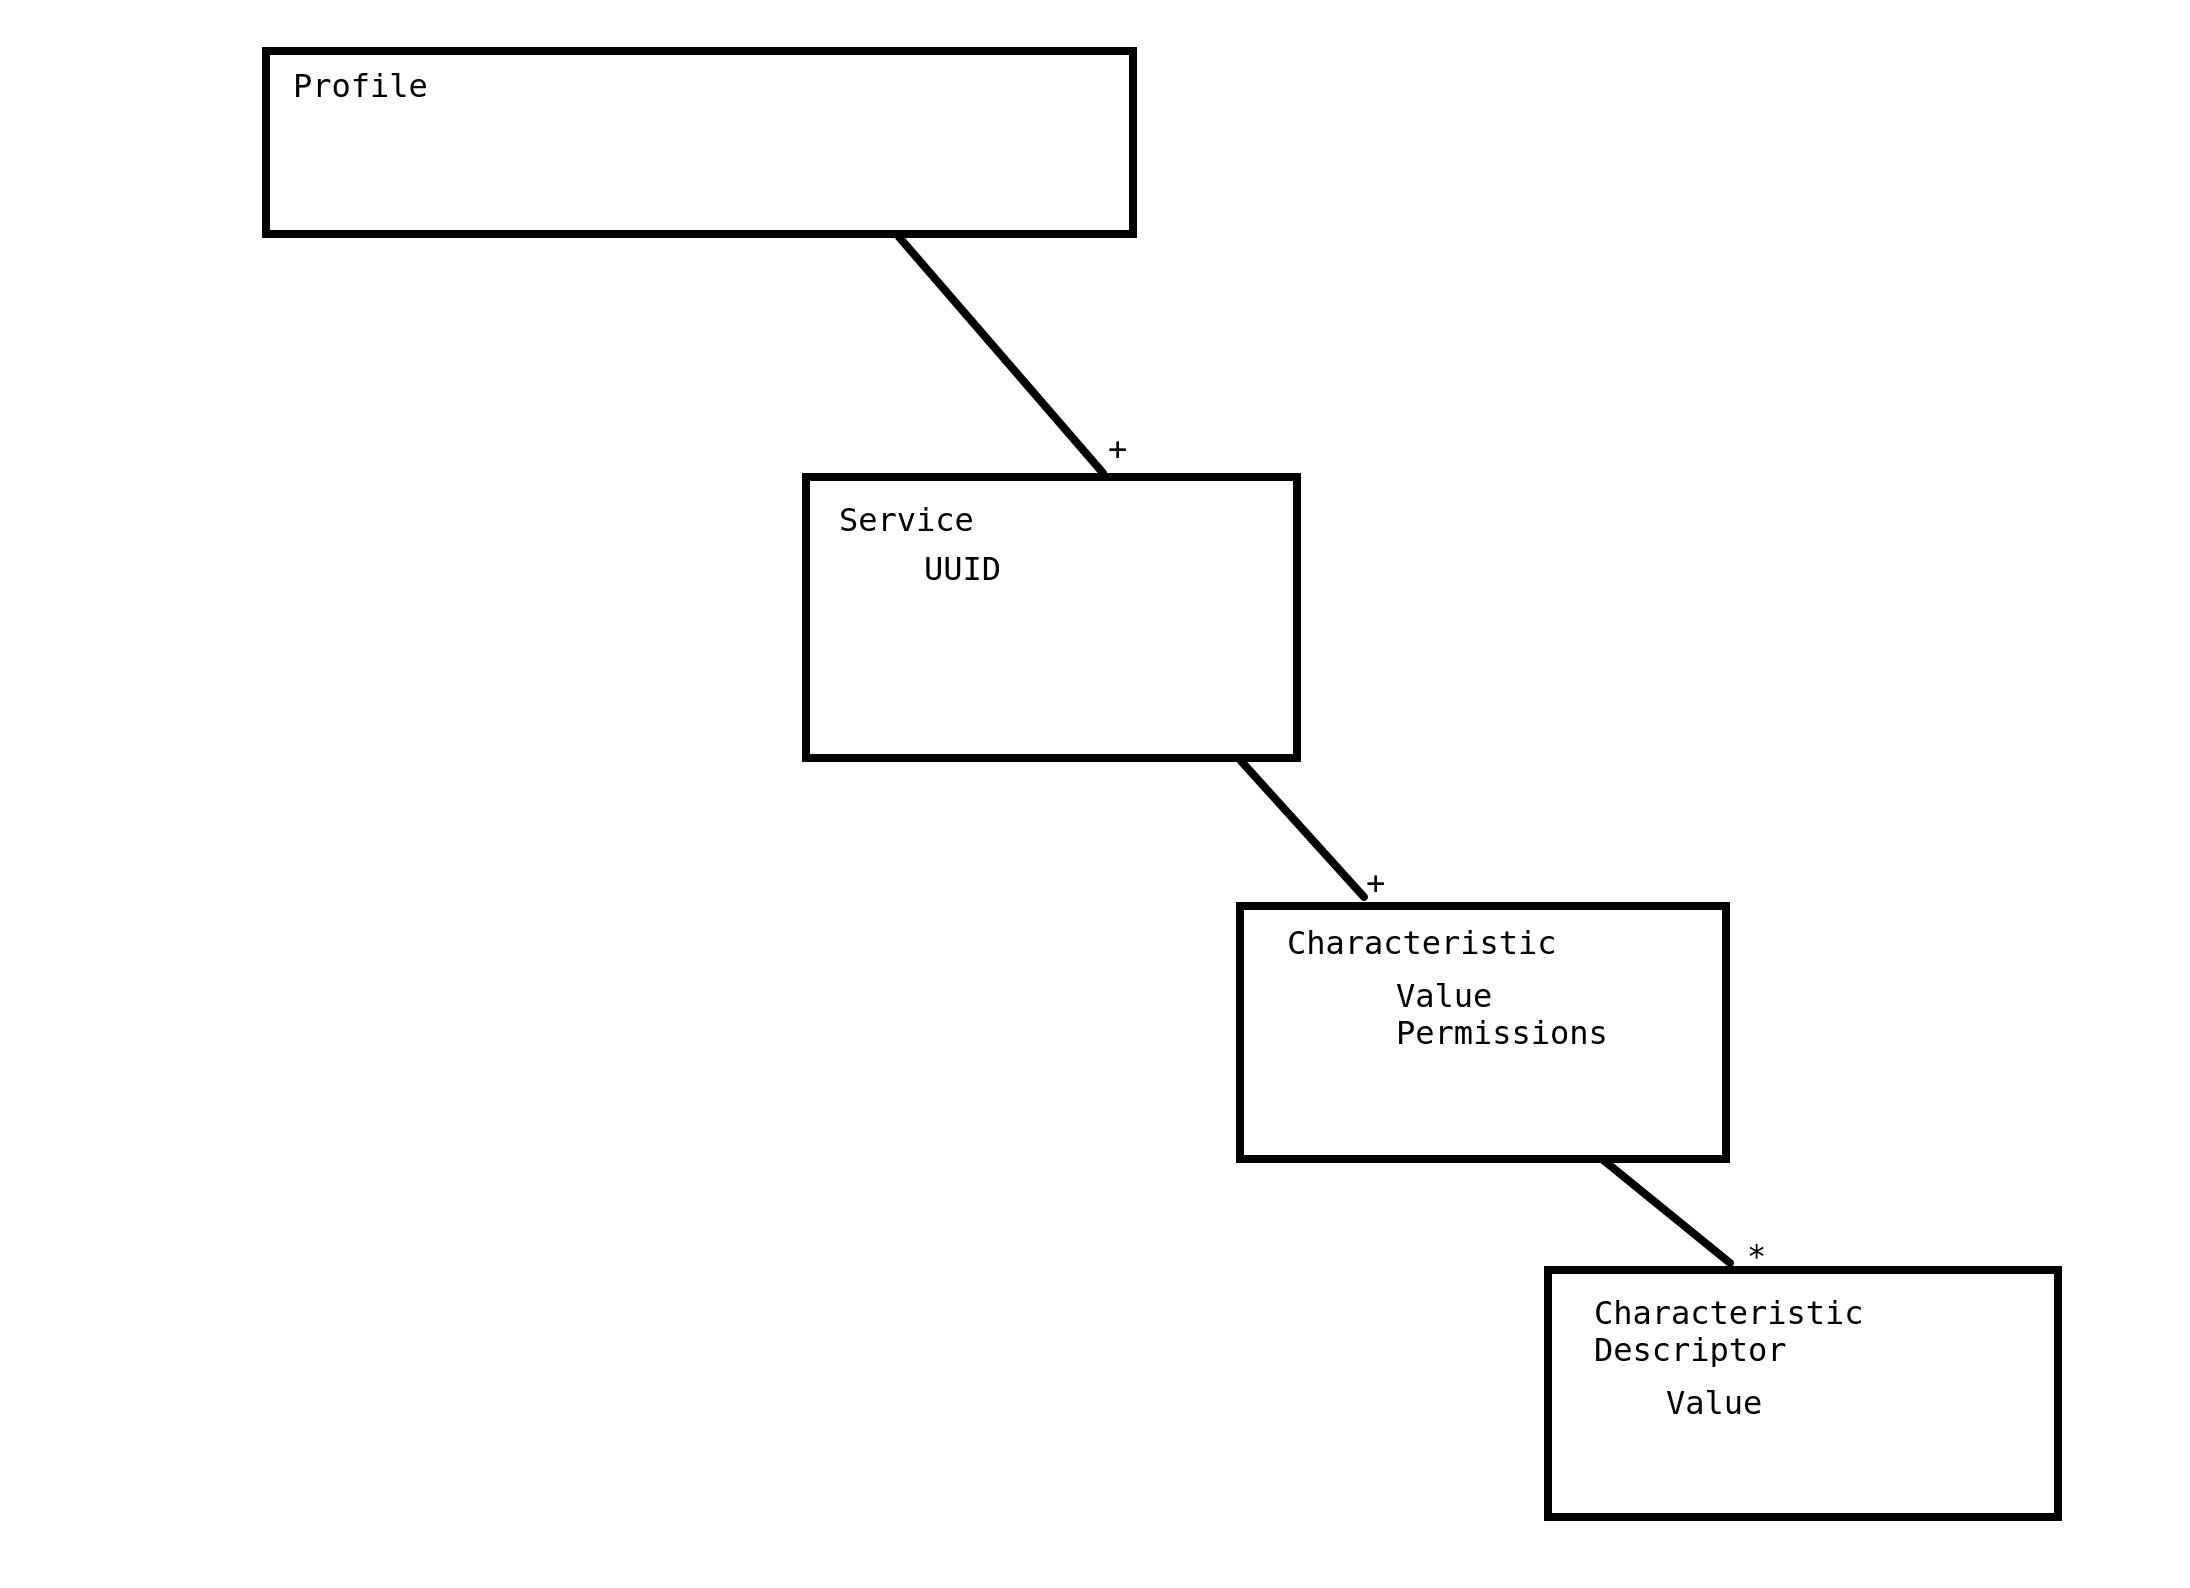
The little “+” on the line indicates that the box above it can have one or more. So a profile can have one or more services in it. The “*” means it can have zero or one. So the Characteristics can have zero or more characteristic descriptors. The words tabbed in are individual fields. So Characteristics have permissions and a value.
However, that’s the conceptual idea, not the implementation. In a more in-depth way, GATT is a big table. Each row has a handle to reference it, kind of like a key in a key/value pair. Then there’s a type, which is a UUID that either matches up with the 16-bit UUID Numbers Document or is custom. Then permissions (READ, WRITE, NOTIFY), and lastly, some sort of value, which depends on the type of that row. Yes, that’s pretty of confusing.
NOTE That 16-bit UUID Numbers Document is really important. It lists all bluetooth-defined UUIDs. These UUIDs are used all over the place to identify the type of row each row in the GATT table is, types of characteristics and descriptors, etc.
Remember that conceptual model? That maps to this table, I’ll walk you through making your own GATT table. Since the profiles are abstract, we can just ignore them for now. So first, we have to declare we have a service. We do this by creating a handle (in my example below, 0x001), setting the type as “Service Declaration”, permission to read only, and then the value as a UUID that says what sort of service it is. Bluetooth has a lot of declared “GATT Service Type” UUIDs in the document I linked above, you can browse them if you want.
Now that a service has been declared, lets declare some characteristics. Instead of having a single row where the “value” column is the value of the characteristic, we first have to do a Characteristic Declaration, like we did the service. So that gets its own handle, the type is “Characteristic Declaration”, it’s read only, and the value has several bits of info:
- the handle of the characteristic value (I’ll get to that next)
- the type of characteristic it is
- the permissions for this characteristic (e.g. if it’s WRITE or READ only).
The type of characteristic is one of the “GATT Characteristic and Object Type” UUIDs in the bluetooth doc linked above, OR a custom UUID that the devs decide on.
Once we have have the Characteristic declaration we can add a row talking about the Characteristic’s value. It gets a handle, type, and permission that all have to match what the Characteristic Declaration said it would have. Finally, the value field for this row is the actual value set by the peripheral. So if this characteristic lets me read the hex color the light is currently set to, the value would be some hex value like 64ff32.
And lastly, Characteristic Descriptors! These don’t get a declaration and then a value row like Characteristics, instead they’re just a single row after the Characteristic Value row. They get a handle, the type is one of the “GATT Descriptor” UUIDs from the bluetooth doc, or a custom one set by a dev, permissions (what permissions depends on the type), and lastly a value. A common descriptor is the “Characteristic User Description Descriptor”, which is UUID 0x2901. The value for this descriptor is a user-readable description for the given descriptor. So for the example characteristic above, a characteristic description descriptor would have a value of “Hex value of light” or something.
Here’s the table I described above, but in actual table-form:
| Handle | Type (defined by UUID) | Permissions | Value |
|---|---|---|---|
| 0x001 | Service declaration UUID (0x2800 for primary services, 0x2801 for secondary) | read only | UUID that matches the “GATT Service type” UUIDs from Bluetooth, or custom value |
| 0x002 | Characteristic Declaration UUID (0x2803) | read only | This characteristic value’s: handle (in this case 0x003), type (one of the “GATT Characteristic and Object Type” UUIDs from bluetooth, or custom), permissions |
| 0x003 | type declared by 0x002 | permissions declared by 0x002 | some value set by the peripheral |
| 0x004 | Characteristic Descriptor (one of the “GATT Descriptor” UUIDs from bluetooth or custom) | depends on descriptor type | some sort of value, e.g. “Hex value of light” |
Oof that’s a lot of theory and examples, let’s get back to what I wanted to do in the first place, poke around at a lightbulb.
Exploring the Lightbulb
Now that I have some idea what I’m looking at, let’s start looking at the lightbulb. There’s several apps that help troubleshoot and look at bluetooth LE connections, I used the nordic smartphone app for android. That gave me some basic lightbulb info:
Name: LEDBlue-8B109BEB
Address: 50:33:8B:10:9B:EB
RSSI: -46
Last advertisement packet:
Raw data: 0x0201060702F0FFE5FFE0FF12094C4544426C75652D384231303942454220051210001400020A04
The Address info is important because that is how it’ll appear in wireshark! Let’s explore some of the services and characteristics the lightbulb is advertising, to give some hints for when we start sniffing.
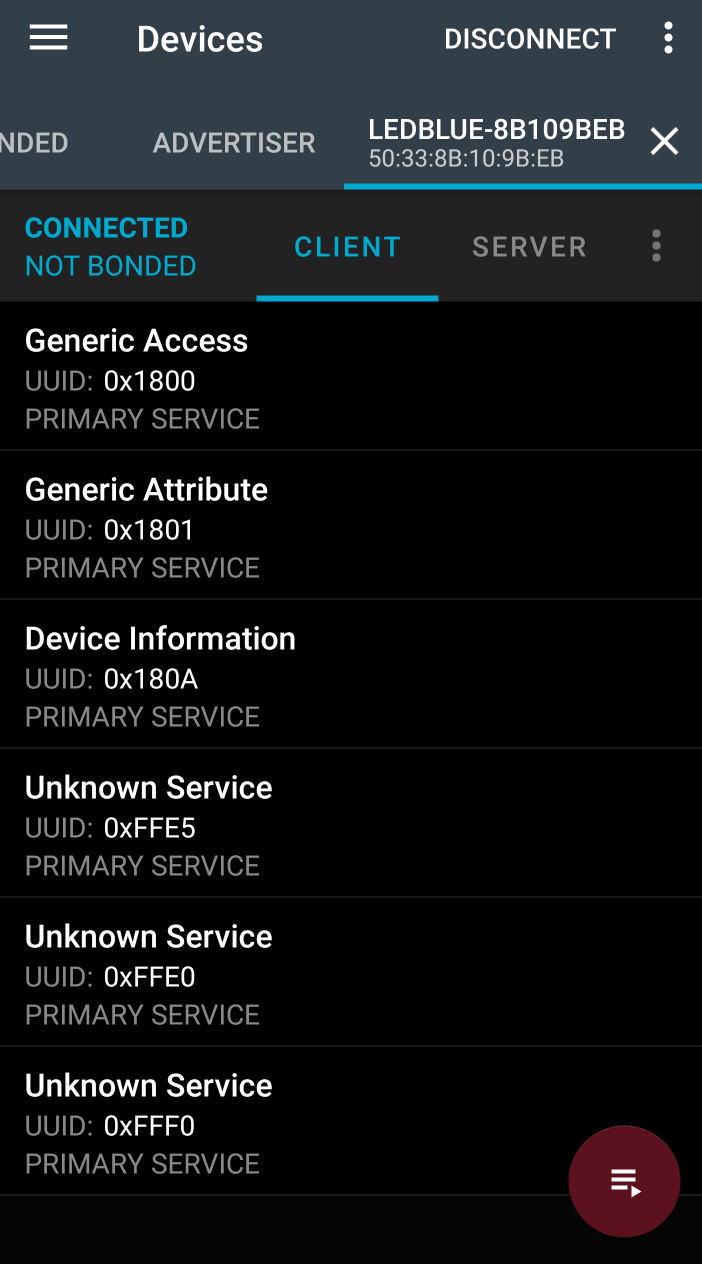
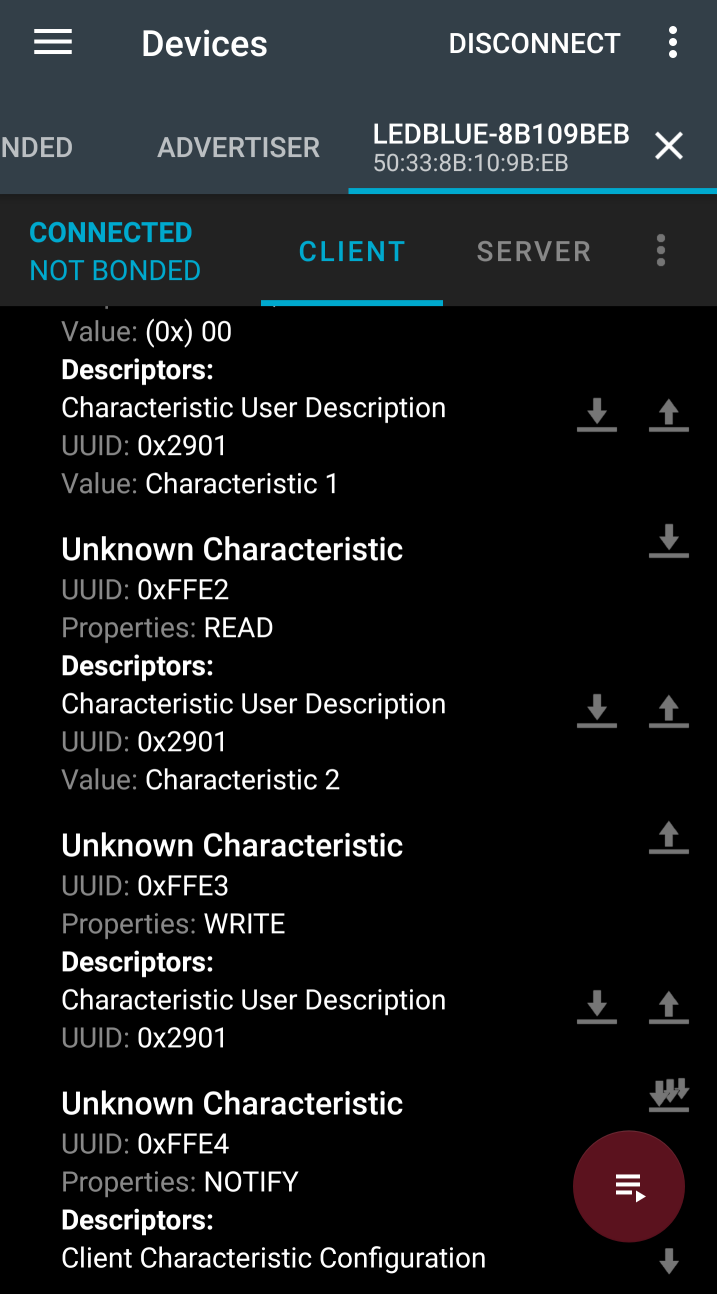
It has several standard services that are designed by bluetooth, the Generic Access, Generic Attribute and Device Information Service. Poking around at them, though, it looks like the characteristics in those services are mostly set to default values, or not set at all. It also has the following Unknown UUID services:
0000fff0-0000-1000-8000-00805f9b34fb
0000ffe5-0000-1000-8000-00805f9b34fb
0000ffe0-0000-1000-8000-00805f9b34fb
The format of the UUIDs follow the bluetooth standard (0000XXXX-0000-1000-8000-00805f9b34fb where XXXX is a unique value), but I looked up the services on bluetooth’s 16-bit UUID Numbers Document and didn’t find anything. So presumably these are custom services designed by the company that made the lightbulb.
I poked around in the different services, and the 0xFFE5 service seems the most promising for controlling light colors. It has several characteristics with descripters that say “Green” or “Red” or “RGBW 4 bytes”. The individual colors have READ, WRITE permissions, but the RGBW characteristic is WRITE NO RESPONSE, which is interesting to note.
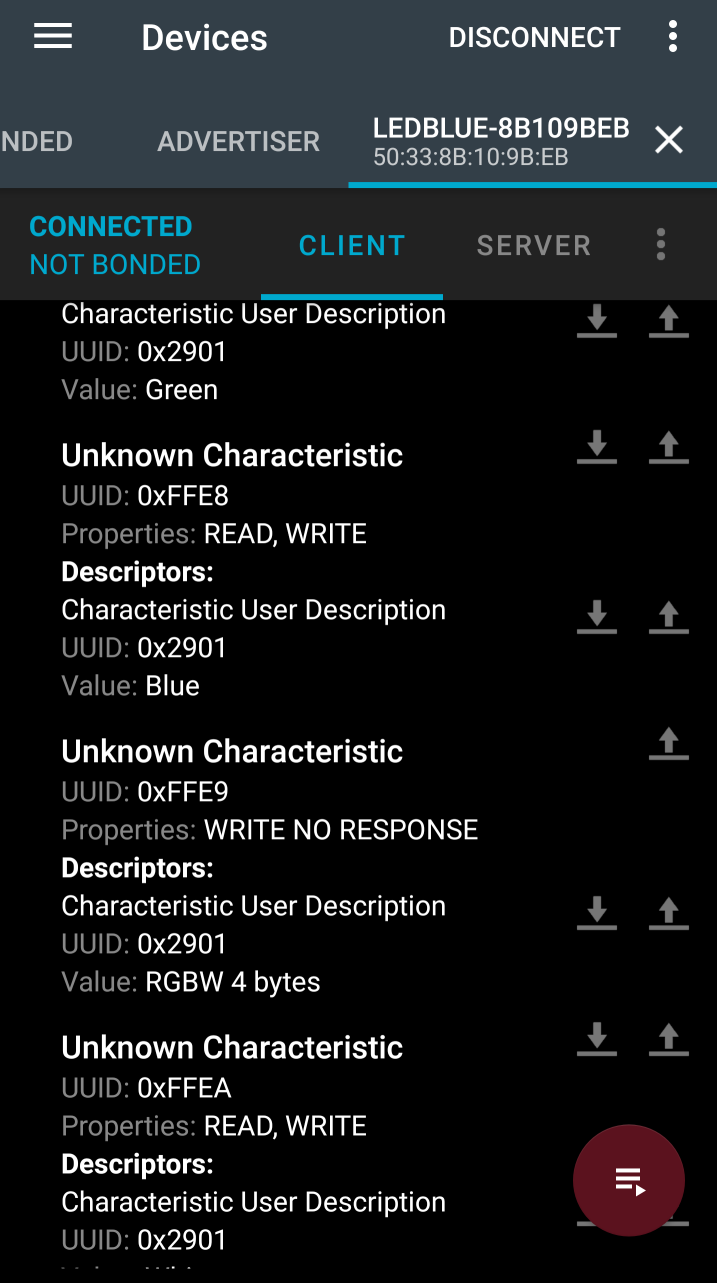
The other unknown services are not has helpful, and most of the characteristics have generic “Characteristic 2” descriptors attached to them. Apparently the devs got tired of giving useful descriptions at this point?
I think this is about the limit of interesting things I can do just looking at the nordic app. Let’s switch to sniffing!
Setting up the Sniffer
Once again, Adafruit has a nice writeup on the setup for the bluetooth sniffer.
The basic steps I did was:
- downloaded extcap folder from adafruit
- copied into my extcap folder for wireshark, which for me was at: /usr/lib/x86_64-linux-gnu/wireshark/extcap
- ran
python --versionto make sure it was 2.7 - tested by going to the extcap directory in terminal and running
python nrf_sniffer.py - ran
sudo pip2 install pyserialto get rid of serial error - tested again and got “No arguments given!” which indicates it’s running right
Once the initial setup was done, I closed wireshark, plugged in the sniffer, re-opened wireshark, and found the sniffer listed as “nrf-Sniffer” in the list of local interfaces on wireshark. But when I double clicked to run, I got the error: “Couldn’t run /usr/bin/dumpcap in child process: Permission denied”. Turns out my account wasn’t included in the wireshark group, so I had to update it by running sudo usermod -a -G wireshark danielle. Once I logged off and then logged on again it worked. I was sniffing packets!
NOTE Nordic semiconductor has a user guide that adafruit saved a copy of, it’s worth a read: https://cdn-learn.adafruit.com/assets/assets/000/059/041/original/nRF_Sniffer_User_Guide_v2.1.pdf?1533935335
Sniffing Packets
During the initial sniffing to see what’s up, I was really frustrated by something so I want to highlight it right away. The sniffer is not guarenteed to catch every packet on the air. So sometimes, it will miss the connection request from the phone to the lightbulb. This means it can’t track that connection, and wireshark wont display any packets after the phone is connected, even if it’s sending lots of data back and forth. If you connect to the lightbulb (or other bluetooth LE device) and wireshark stops tracking it, close the app on your phone, wait for the lightbulb to start advertising again, and try to connect again.
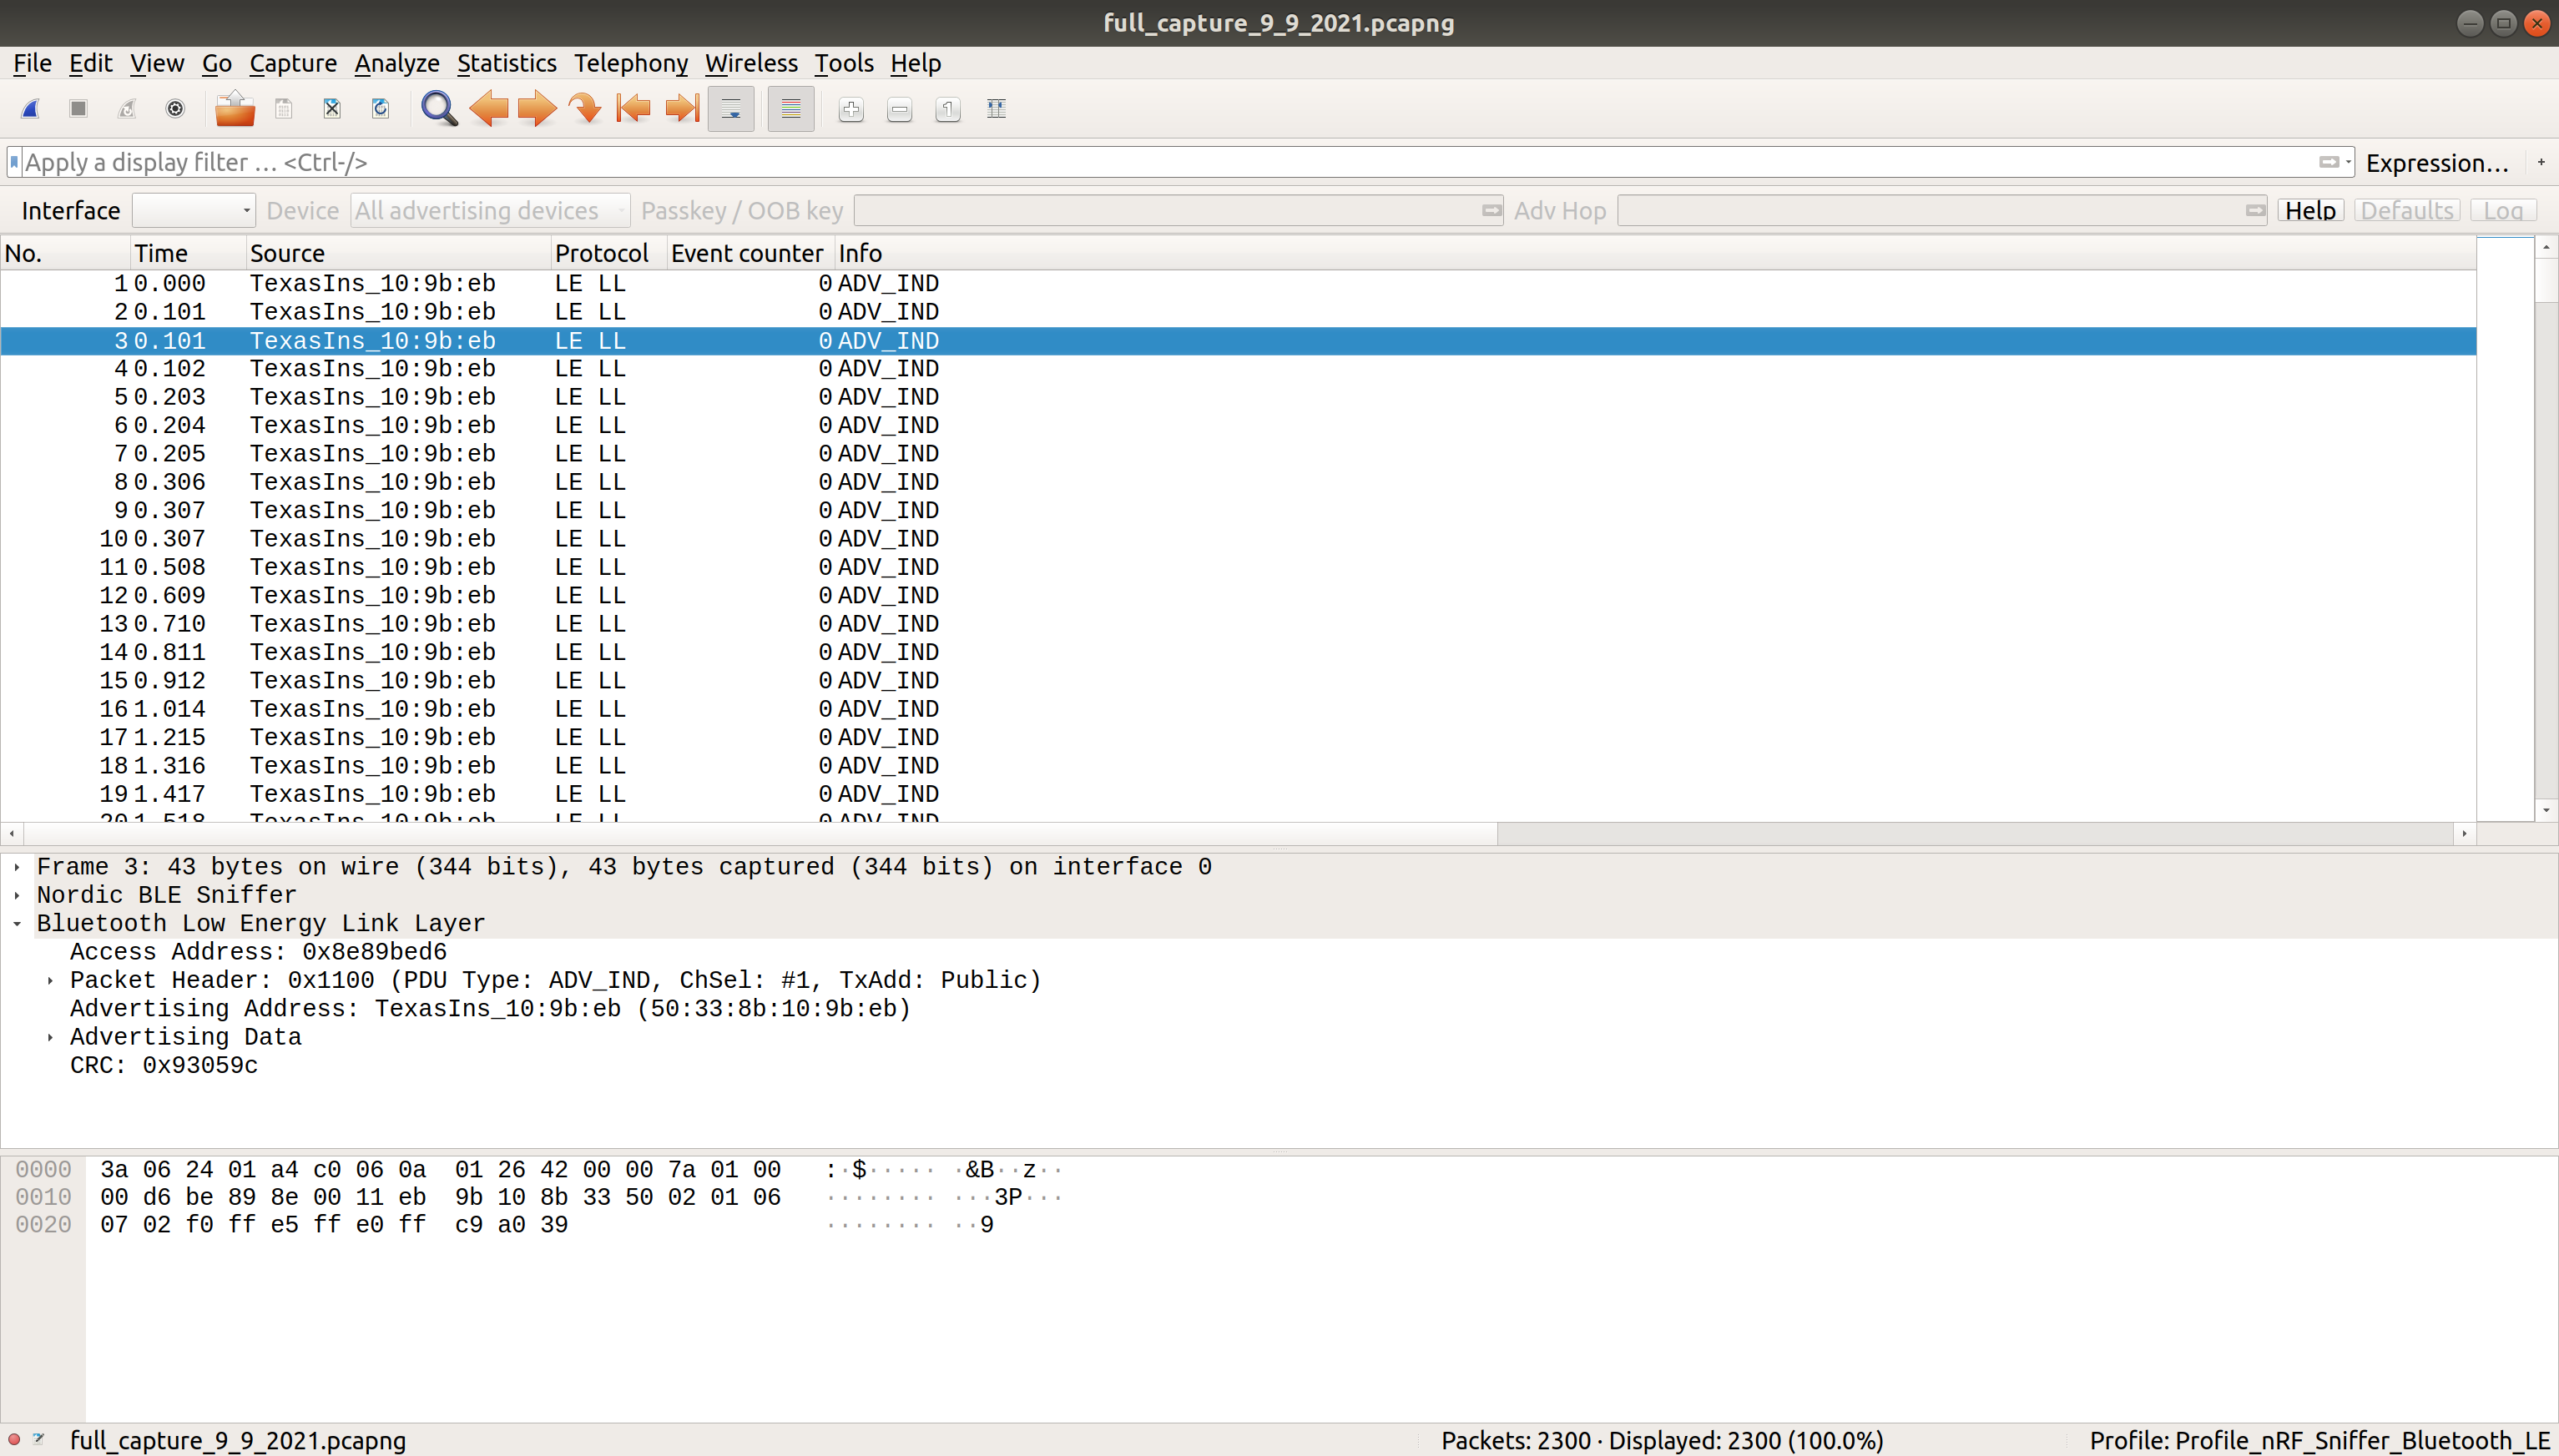
Following One Device
Once the wireshark session is started, you’ll probably be slammed with a bunch of advertising packets from every peripheral device that isn’t currently connected. The nordic add-on for wireshark has a drop down labeled “Device”, which lists the Mac address of all advertising addresses. Select the lightbulb 50:33:8B:10:9B:EB and it’ll only display those packets.
So now it only displays the lightbulb’s packets, but there’s still a lot to read through. Let’s start using some filters.
Parsing a capture
Like I said earlier, I don’t care about the advertising and connecting process. I can’t imagine a lightbulb would have a non-standard connection, so I’m just going to ignore it for now. Wireshark lets you filter out packets by writing statements in the “Apply a display filter” textbox at the top. To use a filter to remove advertising packets, type in !btle.advertising_address and hit enter.
This makes it a bit more readable, but still has packets with protocol “LE LL”, which stands for bluetooth Low Energy Link Layer. This is responsible for advertising, scanning, and creating/maintaining connections, and other protocols rely on it. So again, I don’t think I care about this layer. In fact, I really care about the GATT stuff, so lets only display that. The display filter for that is just btatt.
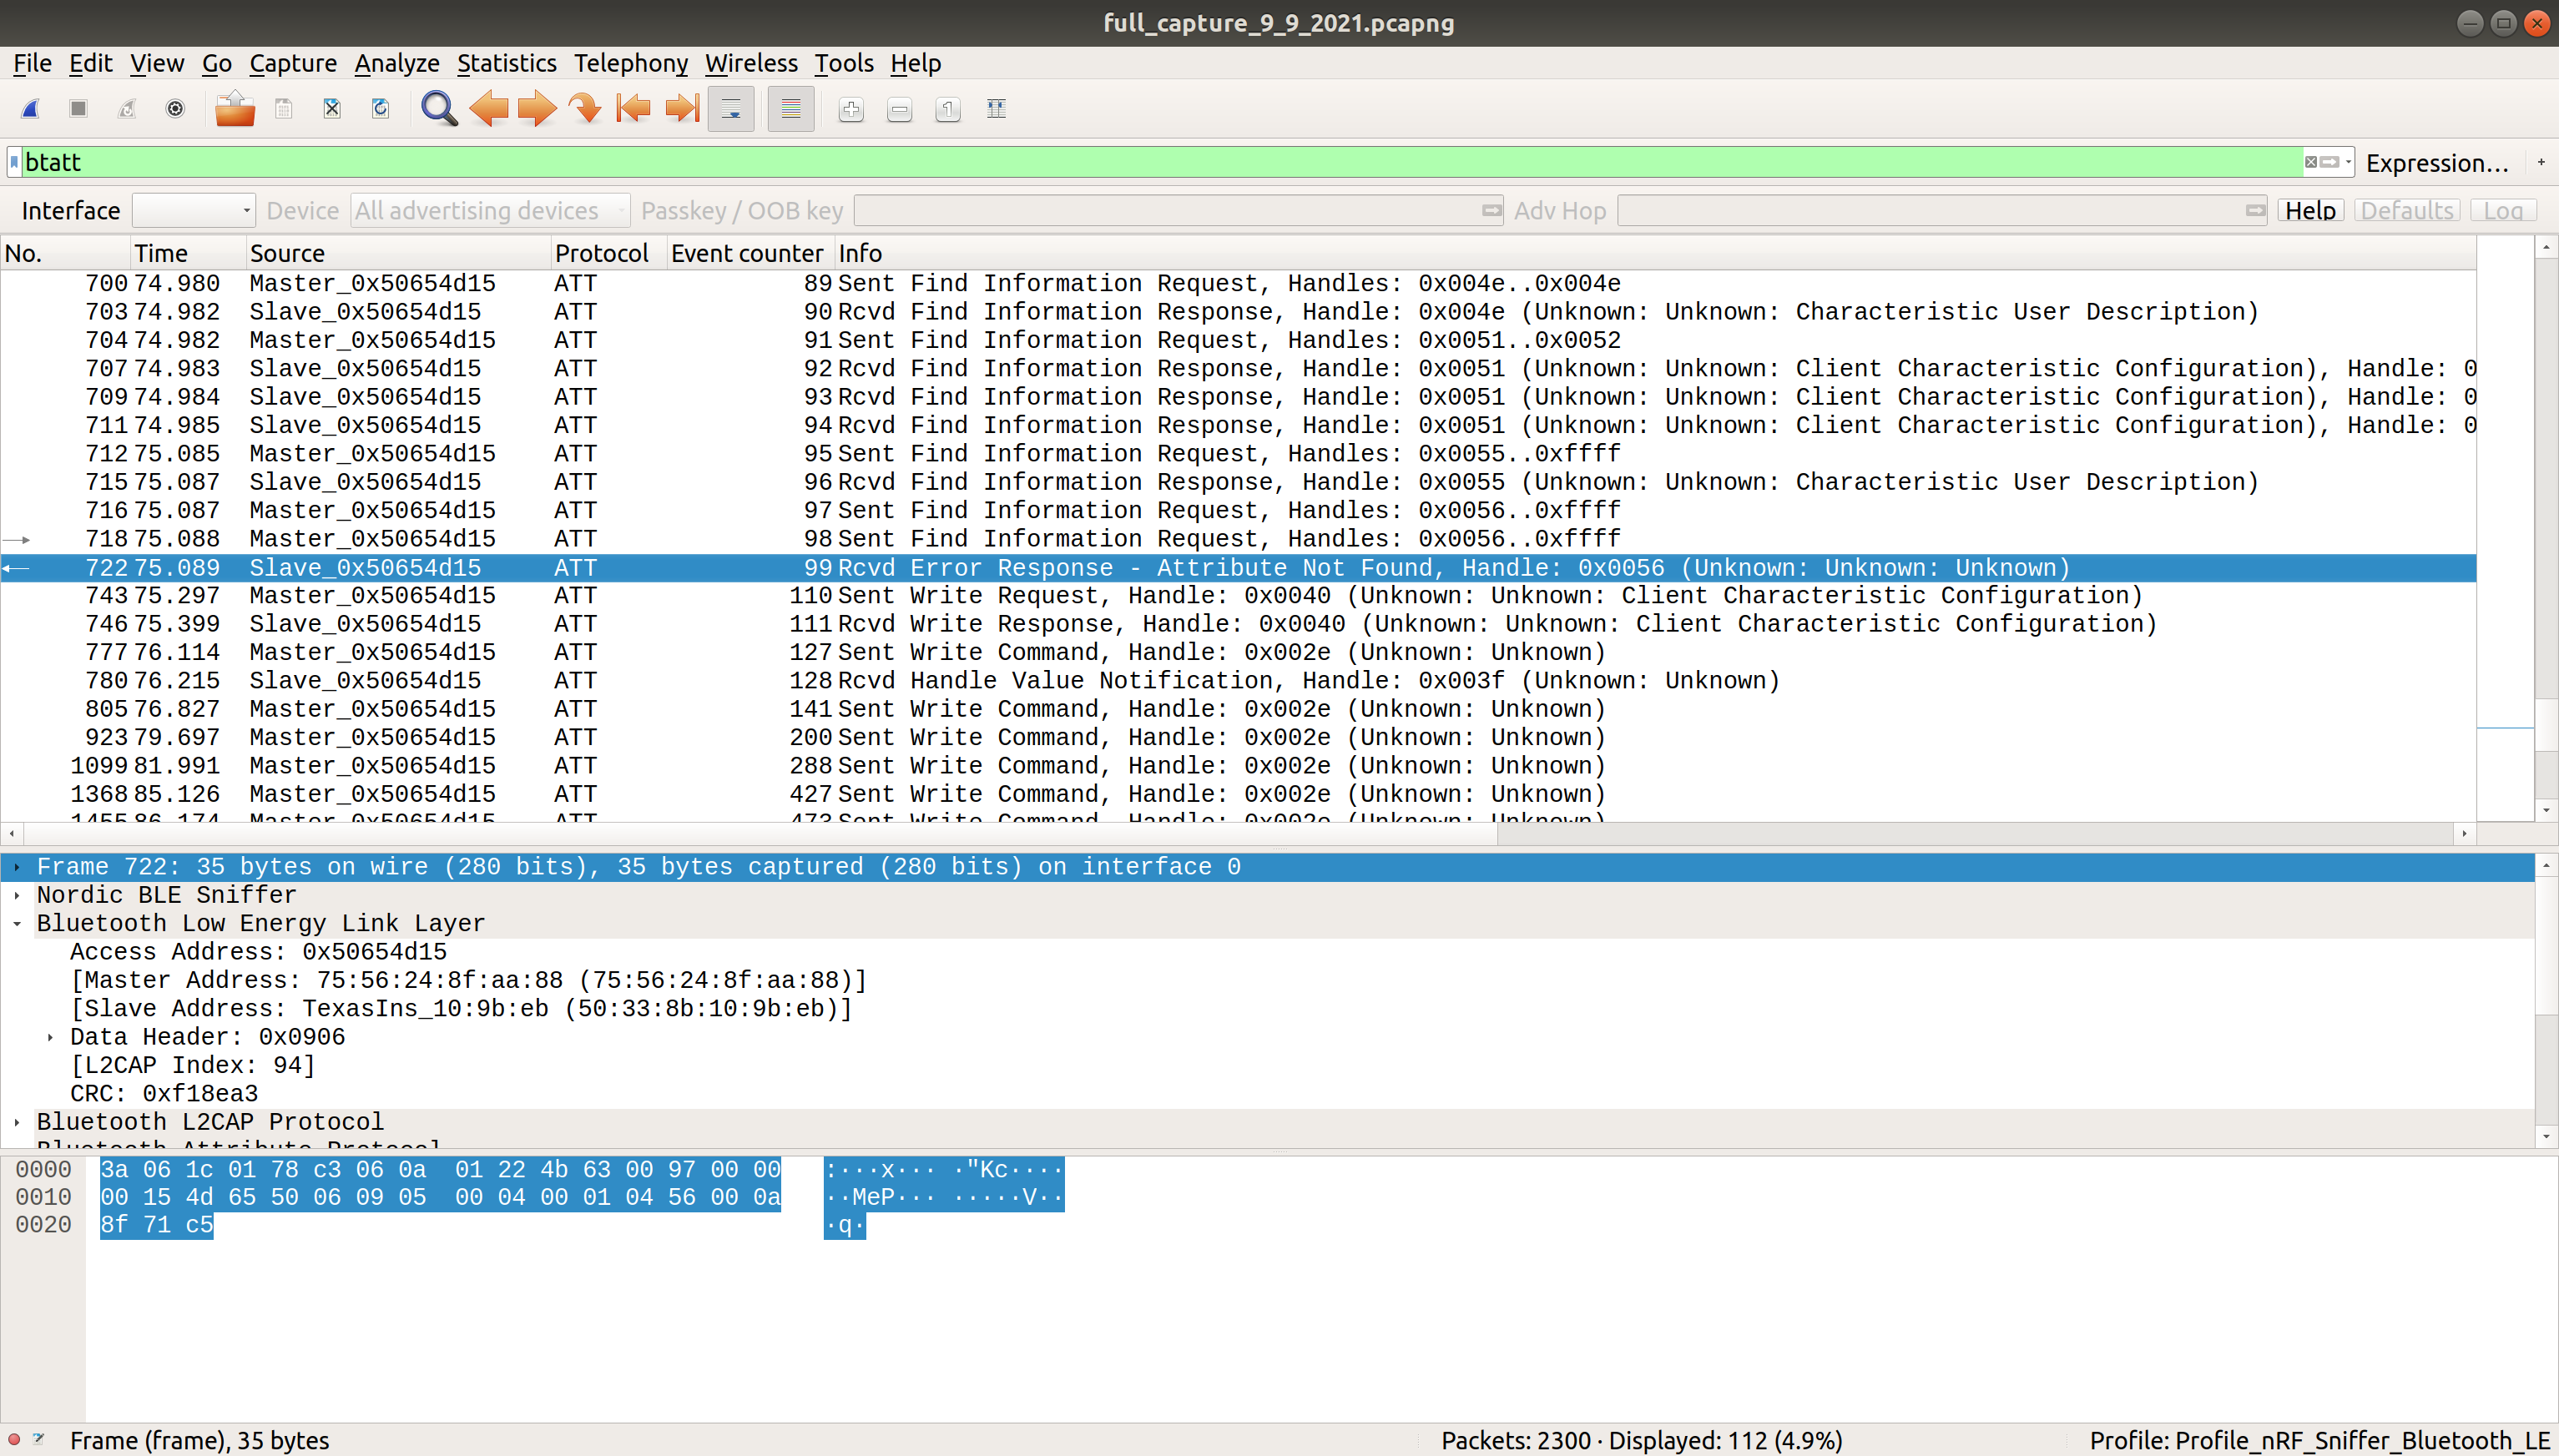
NOTE The Source column switches to “Master”/”Slave” terminology automatically. The “Master” is phone, “the slave” is the lightbulb. I’m not sure how to change that text to a more descriptive option like “Central” and “peripheral” or “client” and “server”, unfortunately.
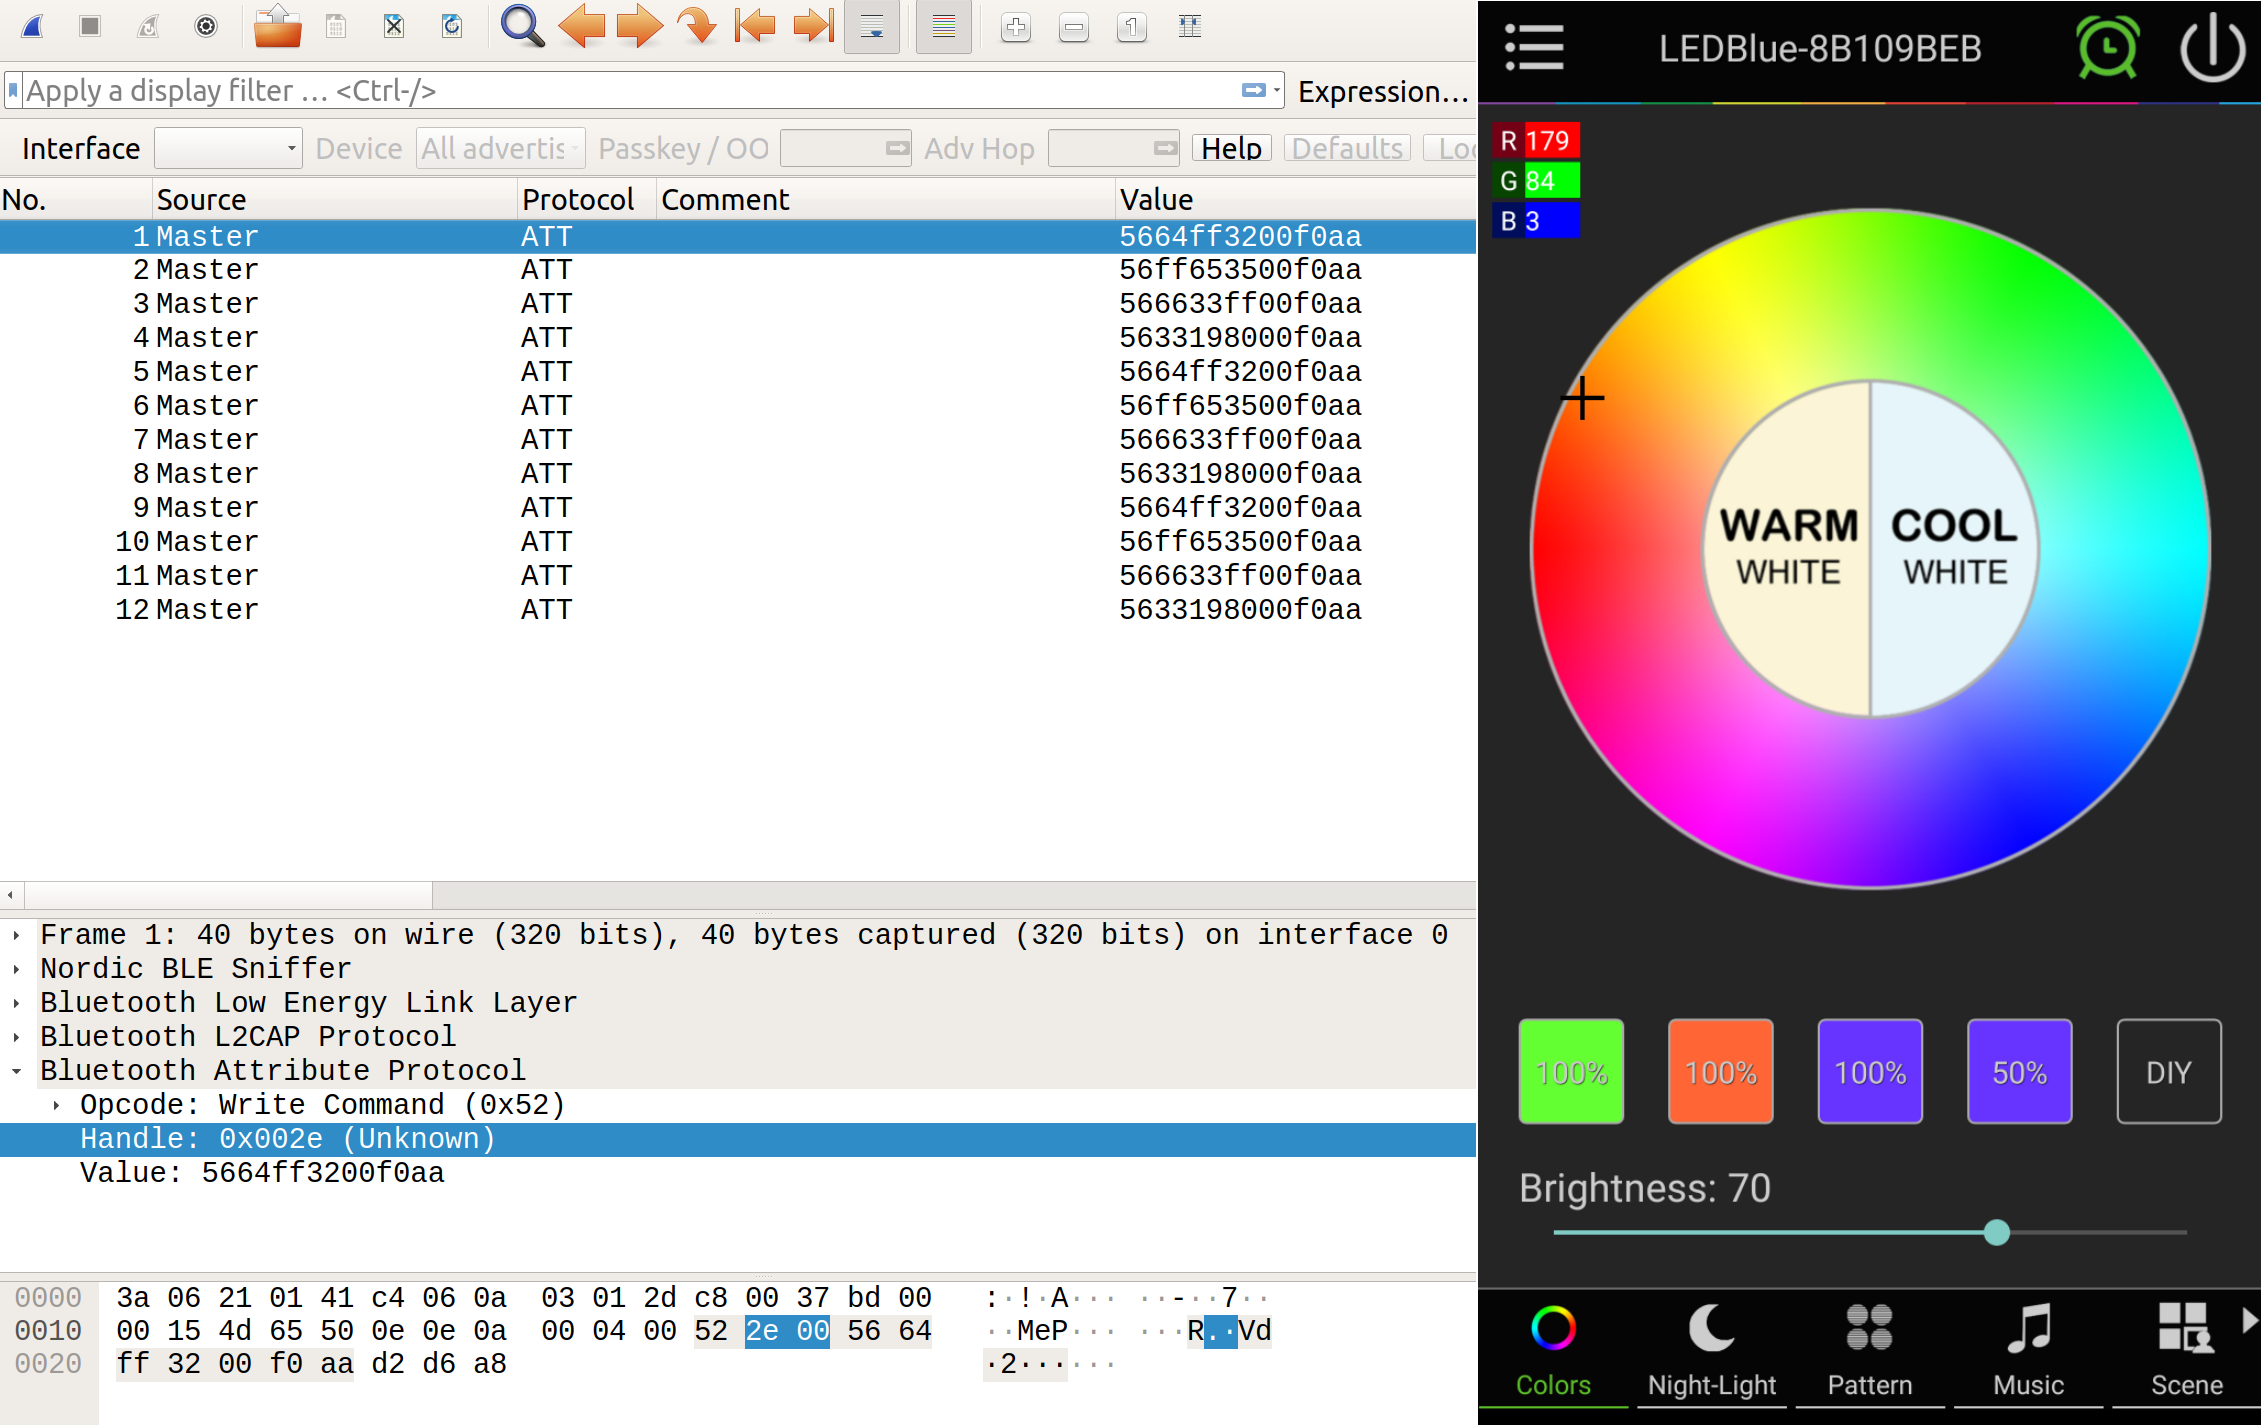
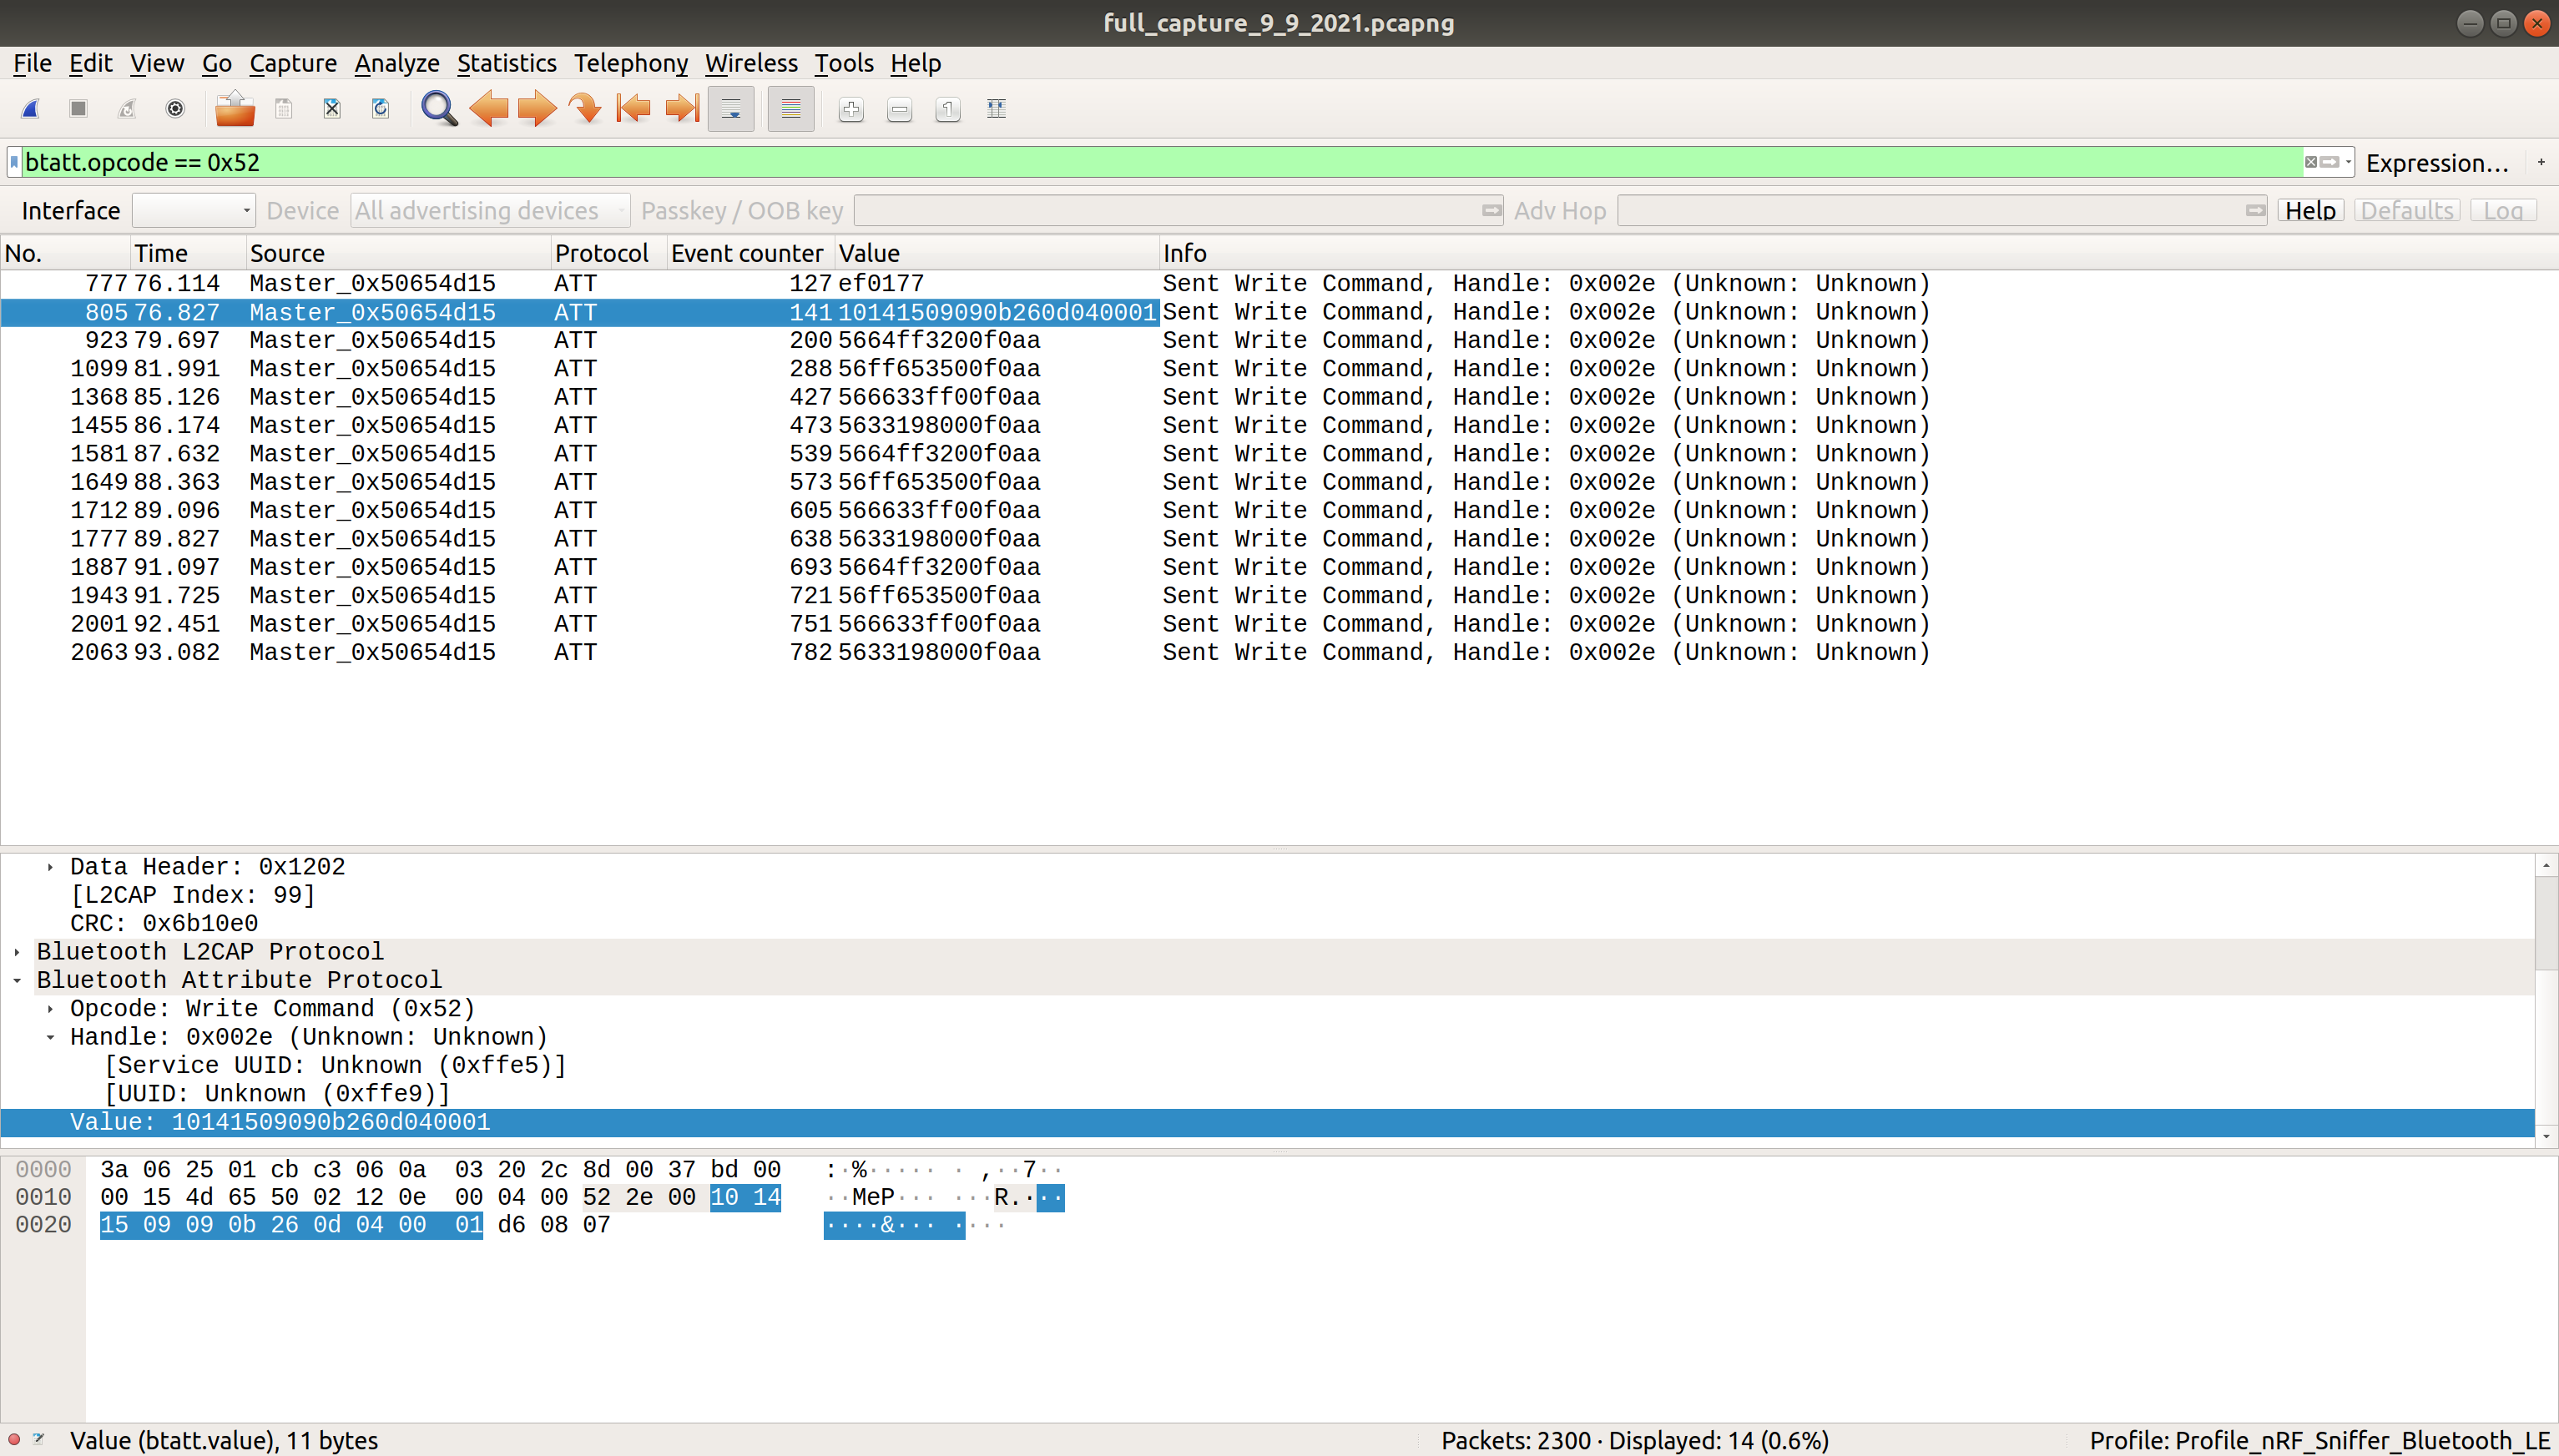
This is a more manageable list. Poking around, we can see initially the phone is sending info requests about different services and characteristics. Then, right at the end of the capture, there’s a bunch of “sent write command” to the 0x002e handle. Changing the filter to btatt.opcode == 0x52 filters the ATT packets down to just the ones sending write commands. The info column gives me the handle it’s writing to, but not the value it’s sending. I can add the value as a column by opening up the packet in the bottom window (aka click on a write packet), right-click on the value, and select “apply as column”.
NOTE I did some cheating on the screenshots, and they’re actually from the capture when I did my testing below. So if you notice any patterns already, pretend you didn’t yet, I’ll talk more about that in the next section!
Now that I’ve poked around some, let’s do some testing.
Hypothesis and Testing
The first thing I want to figure out is something I would think is the simplest: setting the color of the lightbulb. The lightbulb app lets you set the color by selecting a point on a color wheel and set brightness with a slider bar at the bottom of the screen. The RGB of the color you select is displayed in the upper left. You can also save up to 5 specific color/brightness settings and switch to them with a touch of a button. Here’s a screenshot:
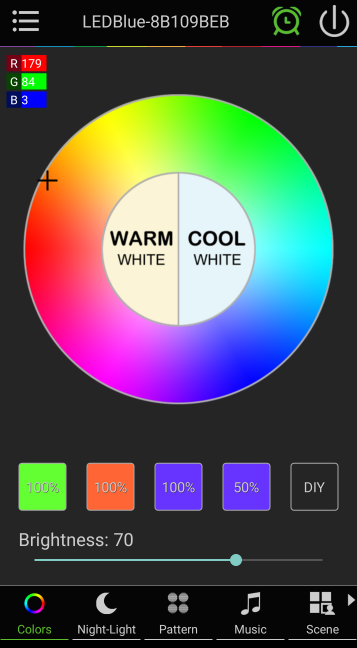
So, my hypothesis: It’s probably sending color data via either RGB or Hex. To easiser find those packets, I can save specific colors, varying the color and brightness, and then sniff the connection while repeatedly cycling through my saved colors.
Here’s the color options I saved, their RGB, Hex, and Brightness values:
| RGB | Hex | Brightness | |
|---|---|---|---|
| option one | 100, 255, 50 | 64ff32 | 100% |
| option two | 255, 101, 53 | ff6535 | 100% |
| option three | 102, 51, 255 | 6633ff | 100% |
| option four | 51, 25, 128 | 331980 | 50% |
NOTE: I made option 3, then set the brightness to 50% and then set that as option four. So it should have had the same RGB values. Since it didn’t, that must mean the app code changed the RGB value based on brightness. So brightness may just be a function of RGB and not a separate variable at all.
With that set, I disconnected from the lightbulb, started a wireshark session, connected, and cycled through the saved colors I just added, going through them in order 3 times.
I stopped the capture and did the filtering I talked about above. Looking at the write commands to the 0x02e handle, and just the values sent, I see a pattern:
Value
5664ff3200f0aa
56ff653500f0aa
566633ff00f0aa
5633198000f0aa

5664ff3200f0aa
56ff653500f0aa
566633ff00f0aa
5633198000f0aa

5664ff3200f0aa
56ff653500f0aa
566633ff00f0aa
5633198000f0aa
All values start with 56 and end with 00f0aa. I cycled through the 4 options three times in a row, and I can see these values repeating three times. Well that seems awfully suspicious…
Sending Custom Commands
As it turns out, my laptop already has all the hardware and software needed to send custom bluetooth LE packets! It’s a linux box, and already has bluez on it, as well as gattool, hciconfig, and hcitool. If you also have a linux box but not the tools yet, Jared Wolf has a blog post about how to install and set them up: https://www.jaredwolff.com/get-started-with-bluetooth-low-energy/.
If you don’t have a linux box, Adafruit does have a tutorial on how to install the bluez stack on a raspberry pi here: https://learn.adafruit.com/pibeacon-ibeacon-with-a-raspberry-pi/compiling-bluez.
Basic steps for use:
- Make sure bluetooth is turned on on computer! In my case, I go to where I set the wifi and make sure the little bluetooth symbol has the word “On” next to it.
- In terminal, run
hcitool dev, which shows any bluetooth hardware connected to my laptop, and it’s status. I took a screenshot of running this command when the bluetooth is turned off, then turned on, to see the difference: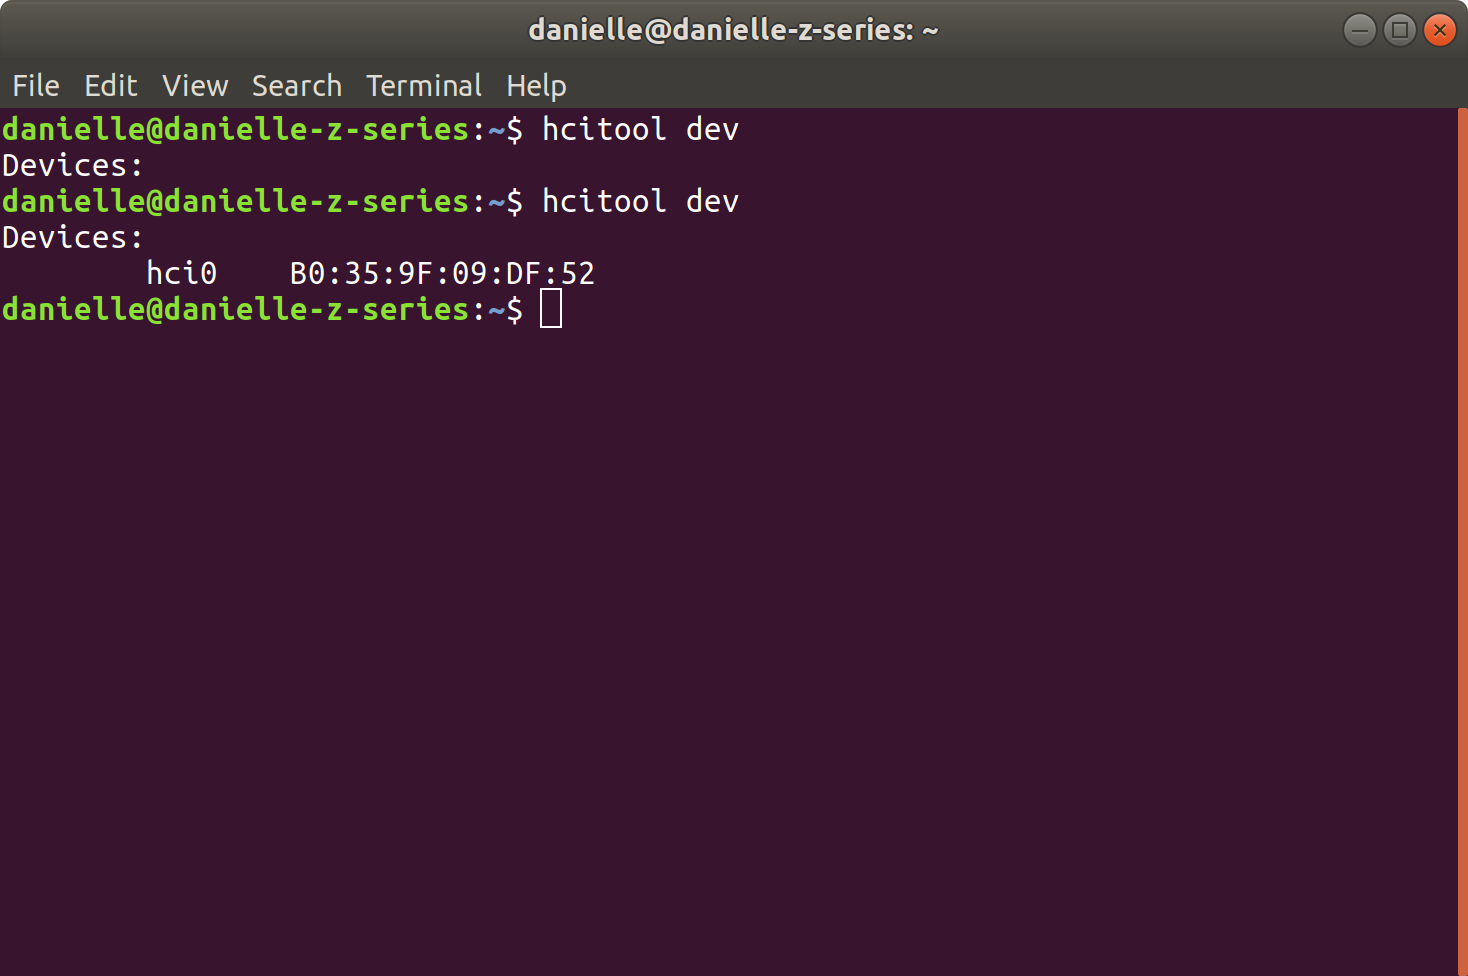
- Running
sudo hcitool lescandoes a low energy scan with the default bluetooth device (my laptop’shci0device) and shows the IDs of any broadcasting peripherals. I spotted the50:33:8B:10:9B:EBdevice so I know my laptop is within range.NOTE if
sudo hcitool lescandoesn’t return anything, you may have to turn off bluetooth and turn it back on again. I had that happen a couple times and it was unclear why that happened. - Run
sudo gatttool -Ito start an interactive gatttool instance, and then enterconnect 50:33:8B:10:9B:EBto connect and start interactive session with lightbulb. For help with gatttool, typehelp
Using the gatt tool’s characteristics command I get a list of all characteristics and their UUIDs. The nordic app listed the RGBW 4bytes characteristic as a UUID of 0xFFE9. The characteristics command gives this line with that UUID:
handle: 0x002d, char properties: 0x04, char value handle: 0x002e, uuid: 0000ffe9-0000-1000-8000-00805f9b34fb
This means the characteristic value’s handle is 0x002e, and it’s the one I’d want to write to if I want to update the RGBW 4bytes characteristic. It also matches up nicely with wireshark’s packet capture. So the lightbulb is sending data to the RGBW 4byte characteristic! This further supports my “it’s sending hex to update the color” hypothesis.
If I only had the wireshark data, I could also work backwards to find out the characteristic it’s writing to. Running primary gives me a list of primary services, and the range of handles for each. Looking at that I can see the 0xffe5 service has handles 0x0023 to 0x0033, so the 0x002e handle is in that service. Relevant line:
attr handle: 0x0023, end grp handle: 0x0033 uuid: 0000ffe5-0000-1000-8000-00805f9b34fb
So I can then run characteristics 0x0023 0x0033 and see all characteristics:
handle: 0x0024, char properties: 0x0a, char value handle: 0x0025, uuid: 0000ffe6-0000-1000-8000-00805f9b34fb
handle: 0x0027, char properties: 0x0a, char value handle: 0x0028, uuid: 0000ffe7-0000-1000-8000-00805f9b34fb
handle: 0x002a, char properties: 0x0a, char value handle: 0x002b, uuid: 0000ffe8-0000-1000-8000-00805f9b34fb
handle: 0x002d, char properties: 0x04, char value handle: 0x002e, uuid: 0000ffe9-0000-1000-8000-00805f9b34fb
handle: 0x0030, char properties: 0x0a, char value handle: 0x0031, uuid: 0000ffea-0000-1000-8000-00805f9b34fb
And I can see the characteristic value handle of 0x002e is for characteristic with handle 0x002d! I can also see that the next characteristic’s handle is 0x0030, not 0x002f. Handles don’t have to be consecutive, but this may mean there’s a characteristic descriptor after the characteristic value. I can search for this by doing char-desc 0x002e 0x0030. And it gets me a result, there is a handle 0x002f, and the UUID of 00002901-0000-1000-8000-00805f9b34fb means it’s a “Characteristic User Description”. Let’s read it with char-read-hnd 0x002f, which gives us:
Characteristic value/descriptor: 52 47 42 57 20 34 20 62 79 74 65 73
And that hex value, when dropped into a hex to ASCII converter, gives us “RGBW 4 bytes”. Yeah that’s a lot of work, I think I’ll stick with the phone app for exploration. Moving on to the fun bit!
I know I should send a write command to the 0x002e handle, and if I want to send a color, I need to have the hex value, surrounded by unknown, seemingly hard-coded values. So sending two different colors would be:
char-write-cmd 0x002e 5664ff3200f0aa
char-write-cmd 0x002e 5633198000f0aa
Hit enter on one of them, and…IT WORKS!!!!!!
After I danced around a bit, I tested it a bit more. Looks like the command to send arbitrary color, where XXXXXX is hex color, is: char-write-cmd 0x002e 56XXXXXX00f0aa. The extra bytes before and after the hex color don’t seem to matter much, though without them it doesn’t work. Something to signify to the lightbulb I’m sending a hex value, I guess.
Other Commands
Using the same process described above, I also looked into the ability to turn the lightbulb on and off, and the default “Warm White” and “Cool White” settings. They all also send to the 0x002e handle, just sending different values. My discoveries:
- Turn off Light:
char-write-cmd 0x002e cc2433 - Turn on Light:
char-write-cmd 0x002e cc2333 - Set to “Warm white”:
char-write-cmd 0x002e 56000000ff0faa - Set to “Cool White”:
char-write-cmd 0x002e 56ffffff00f0aa
For the warm white, I can see it sets the hex color to all zeros, but sets the two zeros after the hex color to ff. This implies to me there’s actually two sets of lights in there. One does the color, and one does the “Warm white” light. Sadly I only have one lightbulb, otherwise I’d be tempted to do a teardown to see if I’m right…
Conclusion
I had my first foray into bluetooth Low Energy, and got to do some real reverse engineering! I haven’t figured out the timers yet, since it’s sending more complicated data, and I need to do more mucking about to decode what it’s sending. But this is a good place to end this post (It’s getting long!), so if I do figure it out, it’ll be a seperate post. Doing this was equal parts fun and frustrating, and I definitely feel like I understand bluetooth LE way more than I did before.
Resources
Adafruit has an intro to bluetooth page if you want a good overview: https://learn.adafruit.com/introduction-to-bluetooth-low-energy
Bluetooth’s developer guide: https://www.bluetooth.com/blog/a-developers-guide-to-bluetooth/
General bluetooth low energy info:https://www.bluetooth.com/bluetooth-resources/bluetooth-le-developer-starter-kit/
Bluetooth Low Energy in 10 minutes video: https://www.youtube.com/watch?v=JSQhRyTKnW4
Nordic semiconductors “devzone” site has some well written info about low energy too: https://devzone.nordicsemi.com/nordic/short-range-guides/b/bluetooth-low-energy/posts/ble-characteristics-a-beginners-tutorial
Getting Started with Bluetooth Low Energy from Oreilly has chapter 4 online, which is about GATT: https://www.oreilly.com/library/view/getting-started-with/9781491900550/ch04.html
Good writeup on using gatttool and hcitool to connect to bluetooth LE devices: https://www.jaredwolff.com/get-started-with-bluetooth-low-energy/#connect-to-your-bluetooth-low-energy-device
Bluetooth has a list of 16-bit UUID Numbers and what they map to. It used to be all on searchable webpages, but they’ve moved it to a PDF: https://btprodspecificationrefs.blob.core.windows.net/assigned-values/16-bit%20UUID%20Numbers%20Document.pdf