Game of Life on the NeoTrellis M4 Express
Once upon a time, I was subscribed to Adabox ( https://www.adafruit.com/adabox), a quarterly subscription box that sends a collection of hobby electronic components that are ready for you to use in projects. Each box comes with a page online that shows different projects you can make with the products you get, and links to more documentation about each product. Honestly it felt perfect for me, someone who loves tinkering with microcontrollers (I’ve built out a pi-hole ( https://pi-hole.net) and a fun cyberpunk halloween costume ( Cyberpunk Hacker Costume) before), but is also pretty new at figuring out what wires and alligator clips and connectors I’d need for what microcontroller. Unfortunately, I was always swamped at work, so I never had the time and energy to dive into the boxes, and I canceled after it became clear they were piling up without any projects being built.
I’ve recently decided to finally unbox some that I haven’t touched yet, and decided the first one I’d try is the Adabox 10 ( https://learn.adafruit.com/adabox010/unboxing-adabox-010). This box comes with the Adafruit NeoTrellis M4, a fun dev board designed to light up and make some noise. The unique things about it are a 4 by 8 selection of neopixels (programmable LEDs) that can also function as buttons, as well as a lot of audio components that let it play audio samples and transform the audio on the fly. This gives you a lot of options for some interactive light shows. Adafruit has quite a few example projects for this board, mainly staying in the music/audio realm. They have drum machines, beat sequencers, and synth boards, to name a few. I was more interested in the interactive light component though, and eventually came up with a relatively simple idea: Make a Game of Life clone. The board could be powered on and left as a fun little interactive art piece in my apartment (I need more techy art, really).
If you want to watch a video of the neotrellis in action, I created a video on youtube
Initial Board Set-up
The first part of setting everything up is the physical, connecting the buttons to the trellis and putting it in a case ( https://learn.adafruit.com/adafruit-neotrellis-m4/assembly). The process was mostly pretty easy, though I will say peeling the protective sticker stuff off of the acrylic case parts was more of a pain than I had hoped. I had to use fingernails, a pocket knife and tweezers before I finally got all the paper off. Once that was done, though, the rest was simple. Slip the buttons into the case in the correct direction, place in the trellis, then add in the rest of the enclosure and screw together. As long as you don’t lose the tiny nuts for the screws in your carpet at all (as a random example…), it’s a breeze. Plug the trellis into your computer and you’re ready to set-up your computer to write some code!
If you’d like the same hardware, these are the parts I ended up using from the Adabox:
-
Adafruit NeoTrellis: https://www.adafruit.com/product/3938
-
Silicone Elastomer 4x4 Button Keypad (you need 2): https://www.adafruit.com/product/1611
-
NeoTrellis M4 Acrylic Enclosure Kit: https://www.adafruit.com/product/3963
-
Adjustable bent wire stand: https://www.adafruit.com/product/1679
-
An A to micro-B USB cable
I decided to set up the board to use the Arduino ecosystem ( https://www.arduino.cc/en/Guide/Introduction) since I wanted to brush up on my c/c++ programming. Adafruit has a nice walkthrough for initial set-up, and I mainly just followed that: https://learn.adafruit.com/adafruit-neotrellis-m4/using-with-arduino-ide.
The basic steps for setting things up is:
-
Update the bootloader
-
Download and install the Arduino Integrated Development Environment (IDE)
-
Add a new board manager to the Arduino IDE
-
Install packages to deal with the hardware of the trellis
-
Set up the arduino IDE with the right permissions to access the connected trellis
Updating the bootloader was a bit confusing, since you have to go to the circuit python website to get it ( https://circuitpython.org/board/trellis_m4_express ), but it still works with the Arduino IDE. The trellis supports multiple developments set-ups, using either the Arduino IDE with the arduino programming language (c++ with some extra bits, essentially), OR you can use circuitpython (python with some extra bits). And when reading the bootloader doc it didn’t explicitly say you could use either development with the same bootloader, hence my confusion. But using the age-old way of development called “try it and see if it works”, I figured it out.
Adding a new URL to the list of board managers in the IDE and downloading the libraries felt pretty familiar as a software dev, and that went off without a hitch, though it took a while to download. Probably the most frustrating part of the board set-up happened once I had gone through all of this, got the basic blink sketch set up to send to the trellis so I can make sure everything works…and it errors out with a permission denied error. Dangit!
processing.app.debug.RunnerException at cc.arduino.packages.uploaders.SerialUploader.uploadUsingPreferences(SerialUploader.java:152) at cc.arduino.UploaderUtils.upload(UploaderUtils.java:77) at processing.app.SketchController.upload(SketchController.java:732) at processing.app.SketchController.exportApplet(SketchController.java:703) at processing.app.Editor$UploadHandler.run(Editor.java:2055) at java.lang.Thread.run(Thread.java:748) Caused by: processing.app.SerialException: Error touching serial port ‘/dev/ttyACM0’. at processing.app.Serial.touchForCDCReset(Serial.java:107) at cc.arduino.packages.uploaders.SerialUploader.uploadUsingPreferences(SerialUploader.java:136) … 5 more Caused by: jssc.SerialPortException: Port name - /dev/ttyACM0; Method name - openPort(); Exception type - Permission denied. at jssc.SerialPort.openPort(SerialPort.java:170) at processing.app.Serial.touchForCDCReset(Serial.java:101) … 6 more
So now it’s off to Google! I found the answer in the arduino IDE doc under an extra “please read” sub-heading (which I’ll admit, I didn’t read) https://www.arduino.cc/en/Guide/Linux# please-read. Apparently for the connected board’s serial port, Linux only allows root and members of a certain group to actually connect to the board.
The steps to fix the issue are:
-
Find what group can access the serial port of your board
-
Find what user the arduino IDE runs as
-
Add the user that runs the IDE as a member of the group that can access the serial port of your board
Which in command line speak ends up being the below commands:
-
See group and user who owns the port the boards connected on (you should be able to see the port it’s on by looking in the IDE under Tools->port):
ls -l /dev/ttyACM0 -
Find the arduino IDE process and see who it’s running as (make sure you’re running the Arduino IDE how you would normally have it):
ps -aux | grep arduino | less -S -
Since I found the user was “danielle”, and the group who can access the port is “dialout”, add danielle to the dialout group so I can access the /dev/ttyACM0 port:
sudo usermod -a -G dialout danielle -
Reboot the computer so it takes effect. (I tried just logging out and logging in but it didn’t seem to take until I did a reboot)
You can verify your user is in the dialout group after your reboot by using the groups command:
groups danielle
You should see “dialout” as one of the groups listed. With that, the permission error should go away and you can now upload Arduino sketches to the trellis!
Code Set-up
Now that we have the initial set-up out of the way, I can actually start writing code to run on the trellis! Since I haven’t worked with the board before, I first tried out some of the example sketches that Adafruit has put out. The second one I tried seemed a promising start to my Game of Life idea, and I ended up using it as a starting point: https://github.com/adafruit/Adafruit_NeoTrellisM4/blob/master/examples/keypad_test2/keypad_test2.ino
The final product I put up on github, if you want to follow along: https://github.com/Dthurow/adafruitNeoTrellisM4Express-GameOfLife
Now for reference, the game of life i’m talking about is John Conway’s game of life ( https://en.wikipedia.org/wiki/Conway%27s_Game_of_Life). The basic idea is that you set the initial state of the game world (which is just a grid of cells, or in my case, light up buttons), and then press go. The game then proceeds according to some basic rules, and because of how the rules are set up, different interesting patterns emerge. The idea is any button that is lit up is considered “alive”, and the unlit ones are “dead”. I used the rules pulled straight from wikipedia as my functional requirements:
-
Any live cell with fewer than two live neighbours dies, as if by underpopulation.
-
Any live cell with two or three live neighbours lives on to the next generation.
-
Any live cell with more than three live neighbours dies, as if by overpopulation.
-
Any dead cell with exactly three live neighbours becomes a live cell, as if by reproduction.
So for programming this, I split it down into two states: the initial set-up, where someone can press buttons to set them to alive/dead, and the actual “game”, where the rules are simply repeatedly applied to the board until someone presses the reset button, which sets it back to the initial set-up state. The game state can also be changed to the initial set-up state if there are no cells alive, since a completely unlit board is pretty boring to look at.
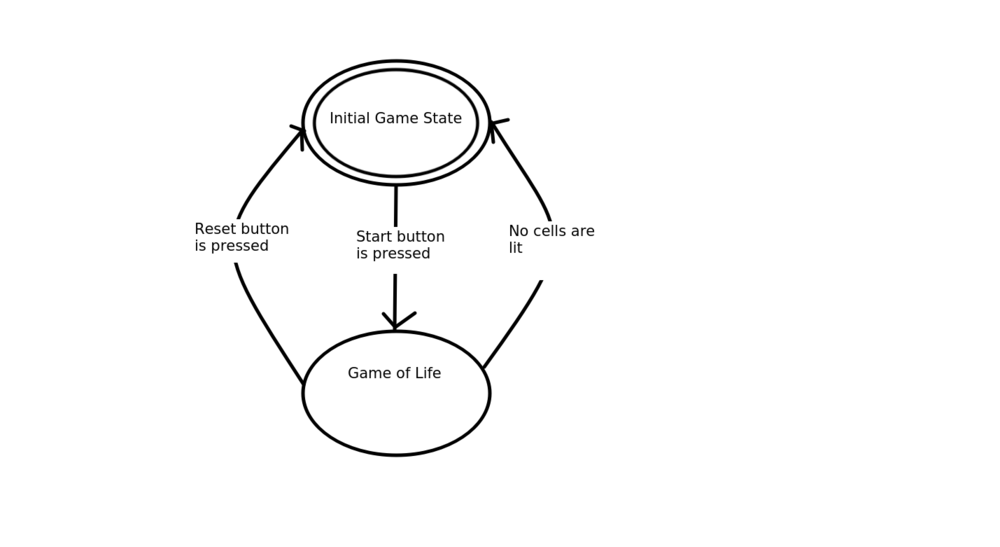
Wow, KolourPaint can do a mean state diagram!
The final program ended up being 222 lines of code, including new lines, and I think is pretty well organized. There’s a boolean that flips between the initial set-up state and the game state, and two boolean arrays, lit_keys listing which buttons are lit up, and new_lit_keys that stores the new lit/unlit state the buttons should be in the next iteration (or “generation”) of the game.
The setup() function does some initialization of the neopixels on the trellis board and the serial port so I can send logs back to my computer, and sets the board to the initial game state with a cleared board, except for the single “start game” button lit. It then enters the loop() function, where it either checks for buttons that are pressed when in the initial game state, or it calculates what the next “generation” of the game should be. Arduinos (including the trellis) call this loop() function repeatedly while they have power, so it’s constantly running this loop over and over (hence the name).
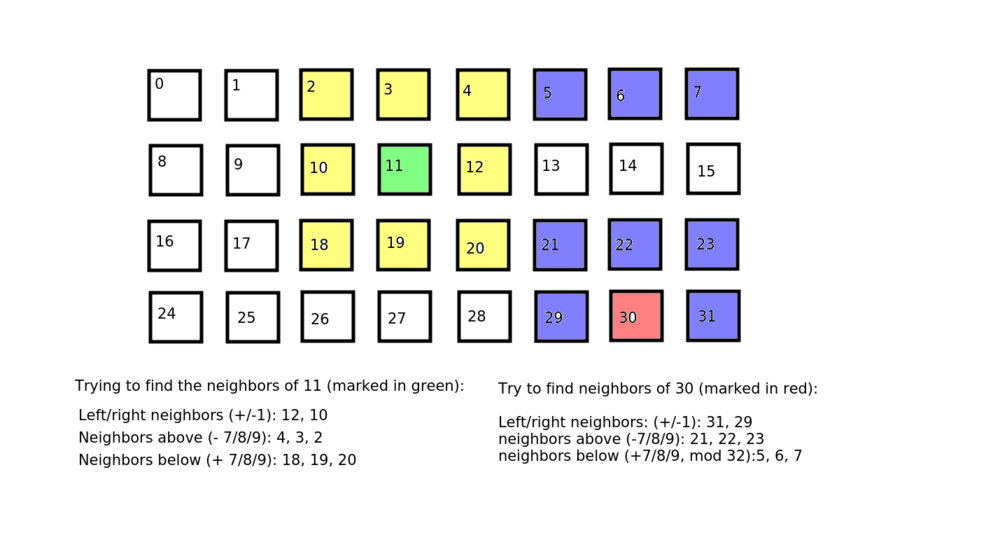
When calculating what the next generation should be, I got to do a bit of interesting math. For each neopixel, I have to look at the neighbors above, below, and beside it, to see if they’re lit or not. The neopixels are arranged in a 4 by 8 grid, but the way to access an individual neopixel to light them up or check if they’re lit is by an index value of 0 to 31. (E.g. light the upper leftmost button, tell the trellis to light up the neopixel at index 0, light up the lower rightmost button, tell the trellis to light up the neopixel at index 31). So finding the neighbor to the left and right of a particular neopixel is easy (they’re +/-1), but finding the neighbors above and below require you to add/subtract 7, 8 or 9. If you add/subtract 8, you’ll find the neopixel directly above/below the neopixel you’re looking at, so +/- 7 or 9 will give you the neighbors that are kitty corner to the neopixel. I wanted the game to also loop around the edges of the board, so a button at the bottom of the 4th row would have the top most row as a neighbor, and vice versa. This let me use one of my favorite mathematical operators, the modulus operator. This lets me loop around the array, so when I add to an index and get more than 31, it will loop back around to the lower indices, keeping my index within the array. Now, some version of mod will also loop you around when the value you’re modding is negative, but the c++ version doesn’t do that, so I had to add logic where if the resulting number is negative, add 32 (the number of neopixels), to get the math right. I feel like this is a lot of words thrown at you, so here’s a more visual representation of what I’m doing:
So for each neopixel, it calculates the neighbors of that neopixel, and then checks the lit_keys boolean array to see if they’re set to on or off. Then based on how many neighbors are “alive”, it sets the new_lit_keys boolean array value to either true or false (saying if that neopixel should be lit or not in the next iteration of the game). Once it calculates the new state for all the neopixels, it updates the lit_keys array with the value from new_lit_keys, and if it’s supposed to be turned on, sets the light to a random color. The game then continues with a new generation, and keeps doing the calculations until either a user presses the reset button, or there are no lit buttons. During my initial version of the game, I had it mostly working, but around 20 minutes of the game going or so, the neighbor calculation zooms off to nonsense land. I put in some logging to see what the neighbor calculation did, and got this when it started going wonky:
12:46:16.230 -> Key 31 became populated

12:46:16.263 -> total alive: 4

12:46:16.760 -> Have neighbors: 412

12:46:16.760 -> Key 0 dies

12:46:16.760 -> Have neighbors: 306

12:46:16.760 -> Key 1 dies

12:46:16.760 -> Have neighbors: 376

12:46:16.760 -> Key 2 dies

12:46:16.760 -> Have neighbors: 414

12:46:16.760 -> Key 3 dies

12:46:16.760 -> Have neighbors: 612
Now, since there’s only 32 total possible neighbors, suddenly having 412 lit neighbors seems a tad unlikely. In my calculation of how many lit neighbors there were, I was using a shortcut, where I was adding the booleans directly to each other and getting a final value. I was doing this because often, false is set to 0 and true is set to 1, so if a particular neopixel is lit, it’ll be set to true, which means a 1 will be added to the final lit neighbor count. I also was initializing the new_lit_keys boolean array inside the GameOfLife() function, whereas the lit_keys boolean array was a global array. So my thought was there were two possibilities for this issue:
-
The boolean “true” wasn’t always 1. Which a quick google proved could be the case (in c++, a non-zero value is considered true, not just 1)
-
I had noticed the lit_keys and new_lit_keys variables were both actually pointers to boolean values that were then initialized as arrays later in the code (because they need to be the the number of neopixels long, I can’t initialize the arrays before the code runs). From my understanding, this is a valid and normal thing in c++. However, the new_lit_keys variable was initialized inside the GameOfLife() function, and then I was assigning values from it to the lit_keys variable. This seemed like a suspiciously good place for some pointer issues, e.g. the lit_keys boolean pointers were pointing to the place in memory where new_lit_keys used to exist, which was later destroyed when the code left the GameOfLife() function. So when I checked the lit_keys array for booleans, it was instead reading random things in memory, and if it wasn’t a 0, adding that to the total neighbors lit up, instead of a 1. So in other words: pointer shenanigans! Which I haven’t had to deal with in ages, since I’ve been using more high-level languages recently.
To fix both of these issues, I made the new_lit_keys variable global, same as the lit_keys variable, and then updated the alive neighbor calculation to return ONLY a 1 or 0, depending on if the neighbor was lit or not. With both of these fixes in place, the trellis seems to calculate the values correctly. Since it requires such a long time before the error happens (the earliest it happens seems to be 15 minutes into it playing a single game), it’s hard to be definitive that it was fixed, but for now, it’s good enough!
Conclusion
This project was really fun! It let me get the Arduino IDE re-set up (I had uninstalled it ages ago), and got me re-familiar with c++ and general Arduino development. I really enjoy doing this sort of embedded development mainly because it’s so nice having a physical result from my programming, not just something pretty on a screen. I press a button and it lights up, because I told it to do that! What’s not to love!
Now the trellis is a dev board which means it has a lot of bells and whistles, so for what I’m using it for now it is wildly overpowered. So I feel like going forward, it’d be cool to either make more use of the capabilities (maybe adding a music component to the game?), or even dive into making custom PCB boards that have enough brains and components to run the game of life, but no more. Regardless, I now have a fun little interactive art piece to decorate my apartment!