Building a NodeJS and Vue App - part 1 Node.js server
When first learning about Node.js, NPM, and the entire ecosystem around javascript frameworks, I found a lot of tutorials and “basic” apps that assumed a lot of underlying javascript knowledge, or assumed you’d never programmed before. Or alternatively, they were tutorials that said “type these mystical commands into the terminal and you now have a working web app!” without actually explaining any of the commands. So yes, I had a working web app, but I couldn’t modify it in any way without reading the documentation for every one of the 100 libraries they decided to use in the tutorial.
The niche of “software engineer learning a new ecosystem with some javascript knowledge to apply to a business domain” felt unfilled. So I want to write out an explanation of the whole thing in a way that makes sense to me. Hopefully there’s enough other people like me on the internet for people to get some use out of it. My previous experience is with .NET MVC web development, so I’ll occasionally be referencing that.
I’ll start with a simple Node.js app that I’ve created as bare bones as possible, and walk through what happens when you first start it. I’m going to make a simple Node.js server that can host static files, as well as serve up a base html page that will eventually load in my VueJS code.
These projects should be simple enough that if you read my article and download the code, you should immediately be able to modify the code into something you can use for your company.
Initial Definitions
Node.js
- asynchronous event-driven JavaScript runtime. Can be used as a server to host static files, including javascript files that are served to the client. https://nodejs.org/en/about/
NPM
- the Node.js package manager, it has two main parts - the software registry where people can host javascript libraries (packages), and the command line tool that lets you download and use javascript packages in the software registry https://docs.npmjs.com/about-npm/
Express.js
- a framework built on top of Node.js that works as a web framework. This lets us build the server to host files, build out APIs, etc. More complicated than other frameworks I could have chosen, it’s also one of the letters in web development tech stacks. E.g. MEAN (mongodb, express.js, angular, node.js). So using it from the get-go means you won’t have to switch frameworks to make a production-ready website. http://expressjs.com/
Javascript Frameworks
- a longer name is Javascript Front-end Frameworks, and is all frameworks designed to run client-side in people’s browsers. Examples include React ( https://reactjs.org/), Angular ( https://angular.io/)), and Vue.js ( https://vuejs.org/). These frameworks need to be “transpiled” from their syntax (often a mix of javascript, html, and framework-specific syntax) and into standard javascript recognized by browsers, which can then be hosted on a server (e.g. nodejs running express)
Things to install
You’ll need to install Node.js and NPM, which are happily bundled together. You can download them both here: https://nodejs.org/en/download/. Beyond that, you’re good. Eventually you’ll be using a javascript framework (in this set of posts, VueJS), but you won’t have to download anything separately for that.
Getting Started
Download the example code here: https://github.com/Dthurow/simple-express-nodejs-app. These commands install dependencies and then start the server. We’ll dive into what exactly they’re doing next.
npm install

npm start
You’ll now be able to see the Node.js server by opening http://localhost:5000
These commands are doing the following. Using the magic of MSPaint knock-off, I made some timing diagrams to give you a better overall sense of what’s happening.
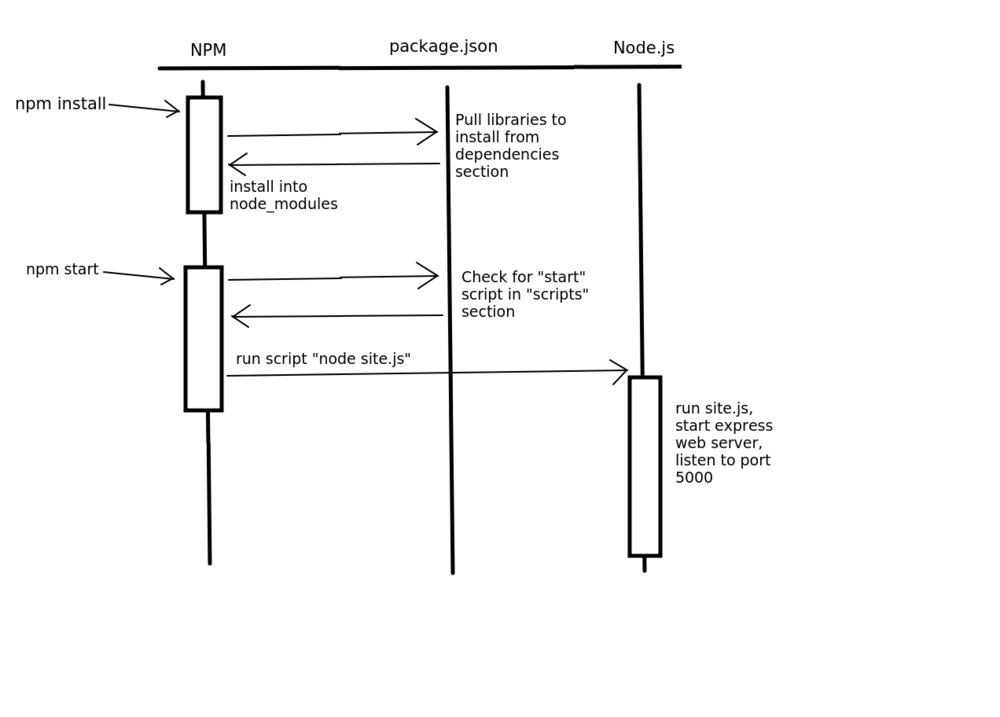
I lost my subscription to Visio, so no fancy diagrams for you.
Package.json
The package.json file stores dependency info for npm, metadata about your Node.js app, and any custom scripts you make. This file is required for node apps to work, and both npm commands you typed rely on it. More info about the sections in it is talked about as they’re used.
Npm install
This command will look at the package.json file’s “dependencies” section and install any packages needed for the server into the node_modules folder. These dependencies can be local folders, but most commonly, they’re libraries published in a registry that NPM knows about. By default NPM is pulling from the registry here: https://registry.npmjs.org/, but you can also add other registries if you want.
 "dependencies": {

   "express": "^4.17.1"

 },
This section says to install express, any version over 4.17.1. Express is the web application code that sits on top of node.js http://expressjs.com/. You can even see the files for this library by going into node_modules with your file explorer. Inside node_modules, each library is in its own folder with the name of the library. You’ll see there’s way more folders than just the one “express” folder, however. This is because npm install will install both your dependencies, and the dependencies of the libraries you’re including. So if you go into the express folder and look at its package.json file, you’ll see a whole list of libraries that express needs to work. So npm went and got those from the registry as well. It does this recursively until they’re all installed.
npm start
This command looks at the package.json file’s “scripts” section. The scripts section of the config can have a list of scripts in name-value pairs, where the value is the terminal command to run. Below is the scripts section in this example:
"scripts": {

   "start": "node site.js"

 },
So “npm start” is equivalent to “node site.js” in this case. You can test this yourself by stopping the server in the terminal (e.g. using ctrl+c), then running “node site.js” instead. By default, if no start script is specified in the package json, it will instead do “node server.js”. I left my javascript file a different name on purpose though, because it’s good to understand the assumptions NPM is making, and also know about the scripts section. The scripts section can be used for other useful scripts, such as running a debug version of your app, or running tests. Each of these can be used by running “npm run [script name]”. The “npm run” allows you to run an arbitrary script from the scripts section, including the start script. So “npm start” is equivalent to “npm run start”.
Site.js
Once you run “npm start” (aka “node site.js”), the node.js app will start running the site.js code. This will be the code that listens to incoming requests and triggers functions based off of rules in site.js. Below is a timing diagram again made using the magic of MSPaint knockoff. We’ll then go line by line in site.js to better understand it.
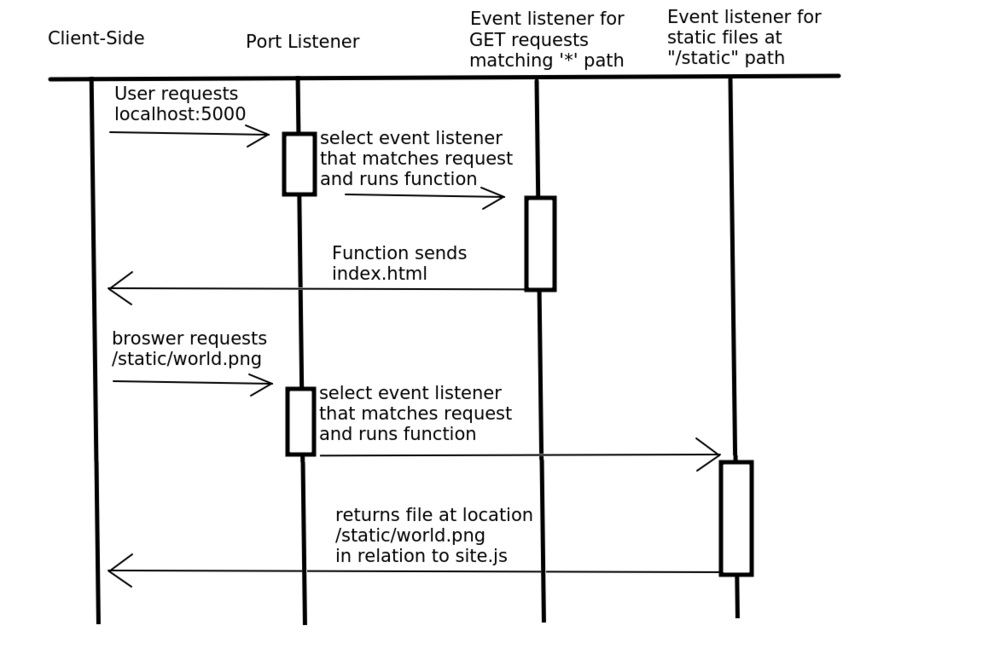
Yes I noticed I misspelled browser in this picture, but I’m not going to fix it. I hereby declare that browsers are now called broswers.
Since it’s a simple app, this file is pretty simple. The entire file is below.
// set up ========================
var express = require(‘express’);
var app = express(); // create our app w/ express
// configuration =================
// all files in the static folder can be referenced by the url /static/[blah]
//and wont be caught by the GET request listener below
//you can change the public facing URL by changing the “/static” string
app.use(‘/static’, express.static(‘static’));
// application ————————————————————-
// all GET requests will be directed to the index.html file
app.get(‘*’, function(req, res) {
res.sendFile(__dirname + ‘/index.html’);
});
// start listening on the correct port ======================================
| const PORT = process.env.PORT | 5000; //if an environment variable PORT is set, use that, otherwise use port 5000 |
app.listen(PORT);
console.log(“process env is: “ + process.env.PORT);
console.log(“App listening on port “ + PORT);
What it’s doing is a 3 step process.
*Declare express as the server code to use
*Declare where static files are and routes the app will listen for on the incoming requests
*Set what port it should listen for incoming requests on
Let’s break that down a bit.
Declare express as the server code to use
var express = require(‘express’);
var app = express();
This loads in the express library, and creates a new instance of the express server. The require() function is a Node.js function that will load libraries. By default if you pass in just a string, it will look in the node_modules folder. So if you didn’t type npm install before trying to run the site, it will error out because it can’t find the express folder in the node_modules folder.
Declare where static files are
app.use(‘/static’, express.static(‘static’));
This tells the app that everything in the static folder should be served up as-is, and the string “/static” tells us what URL should be used. If you’ve used IIS before, this is kind of equivalent to virtual directories, but in the code. If you want to change the folder name in your project, you’d update the string in the express.static() call to the new folder name. If you want to change the outward-facing URL, you’d change the first string in the app.use() call.
Declare routes the app will listen for on the incoming requests
app.get(‘*’, function(req, res) {
res.sendFile(__dirname + ‘/index.html’);
});
This section creates a listener for GET requests that match the ‘’ route path (aka all of them), and it triggers the given anonymous function. The route paths are strings or regular expressions, and can also specify dynamic parameters. The function that handles requests that match the ‘’ path always returns the index.html file. The __dirname variable is a Node.js variable that always represents the full path to the directory the currently executing code is. Since the index.html is at the same level, we just have to specify the file name and it will return the correct value. To learn more about express’s routing functionality: http://expressjs.com/en/guide/routing.html
Set what port it should listen for incoming requests on
| const PORT = process.env.PORT | 5000; //if an environment variable PORT is set, use that, otherwise use port 5000 |
app.listen(PORT);
Here, it’s setting the port to listen on as either what the environment variable PORT is set to, or port 5000. This gives an easy way to deploy the code someplace with a different port number, while still having a default port you can use while testing. In my case, I like this so I can easily deploy my nodejs app to Heroku and get the app running online.
Index.html
Let’s look at the file we’re always serving on GET requests, index.html. Right now it’s a standard html file, that’s referencing an image in the static folder. It can access the static folder because we told express in the site.js file to treat the static folder as the place static files come from.
<!DOCTYPE html>
HELLO

Conclusion
We now have a simple Express app using Node.js to serve up an Index.html and static files. Next time, we’ll be incorporating the VueJS code into our site.